What are the most commonly used 3D printing hardware parts for projects? A lot of 3D printed projects require additional hardware and having those parts on hand, be it 3D printing fasteners or otherwise, will ensure your projects go smoothly. It really stinks needing a part and not having it. Then having to order it and wait multiple days for it to show up!
Whether you are a 3D printing veteran or just starting out on your journey, having a supply of commonly used 3D printing hardware on hand makes building projects more fun! No having to wait for your 3D printing fasteners, magnets, bearings, etc. to arrive when you’ve already got a small stockpile. Follow along as we detail all the most commonly used 3D printing hardware so you are prepared for anything!
Table of Contents
This post contains affiliate links, which means I may receive a small commission, at zero cost to you, if you make a purchase through a link.
3D Printing Hardware for Projects
A lot of 3D printed DIY projects will require additional hardware. If you’re anything like me, you will want to have a majority of these parts on hand. That way when you discover a project to build, you don’t have to purchase anything. Or even more importantly, have to wait for parts to be shipped out to you. That is where having a proper 3D printing hardware kit comes in handy!
The Nuts and Bolts of 3D Printing Supplies
Some of the most common 3D printing hardware you will need are going to be nuts and bolts. Tons and tons of projects require nuts and/or bolts for assembly. One thing to make note of is what type of head the specific bolt(s) you need are. There are many types of bolt heads and unfortunately, no set standard for project designers. So no one bolt type will work in every situation.
For what its worth, when I started out, I picked up a dedicated 3D printing hardware kit for each of the following bolt types: M3 bolts, M4 bolts & M5 bolts. Each hardware kit was comprised of Socket Head Cap Screws (SHCS) as well. And really, outside of a few edge-cases, these SHCS have worked out pretty good for me overall.
M3/M4/M5 3D Printing Fasteners Combo Kit
There is this 3D printing hardware kit that has a collection of M3/M4/M5 bolts all bundled together. And while this is a good hardware kit, it doesn’t have much variety in terms of offered bolt lengths. All that being said, individual 3D printing hardware kits for each bolt type are not all that cheap. So this combo collection may be a good middle ground in terms of price and part variety.
Basically, it all boils down to less up front investment with the downside of only a select few bolt sizes, but as a single kit, rather than 3 individual kits. If you’d rather have more variety and more parts, you can go with a dedicated 3D printing hardware kit for each bolt type like I did, starting with an M3 Nuts & Bolts 3D Printing Hardware Kit.
M3 Nuts & Bolts 3D Printing Hardware Kit
Probably the most common type of bolt you will need for your 3D printed projects is going to be M3 bolts. I originally purchased this specific M3 Bolt 3D Printing Hardware Kit but didn’t know any better. Turns out, I had to purchase separate M3 bolts for projects on a few different occasions. Specifically, M3 x 4mm bolts and M3 x 25mm bolts which didn’t come with the kit I obtained.
Learn from my mistake and go with this M3 3D Printing Hardware Set (shown in the photo) if you’re in need of some M3 bolts instead. Not only is it much cheaper in terms of the cost per piece, but it also has a lot more variety in the lengths of bolts it includes. Like those previously mentioned M3 x 4mm bolts and M3 x 25mm bolts!
This 3D printing hardware kit includes 1,110 total pieces (1,111 if you include the Allen key). The bolt lengths range from as small as 4mm all the way up to 30mm. You get 55 of each of the smaller bolts and 30 of each of the larger bolts. There are also 300 nuts and 300 washers. My original kit did not include washers either…
M4 3D Printing Fasteners
While M3 bolts may be more commonplace, still loads of projects use M4 bolts in their designs. Having a decent supply of M4 bolts on hand will ensure you have what you need, when you need it. This M4 3D Printing Hardware Kit is going to give you a large variety of bolts, ranging in lengths from 6mm all the way up to 50mm!
This M4 3D printing hardware kit comes with 720 total pieces (721 if you include the Allen key). You got 20 of each individual bolt along with 240 washers and 240 nuts.
M5 Nuts & Bolts 3D Printing Hardware Kit
When it comes to 3D printing hardware for nuts and bolts, M5 bolts don’t seem to be too common. Generally speaking, M5 bolts are reserved for use on larger sized projects or projects that need extra strength. That being said, it is nice to have a small stockpile for when a project pops up that does need them.
These M5 3D Printing Fasteners come in a bundle with 210 total pieces. Interestingly, mine did not come with an Allen key. This fastener kit has bolts ranging from 6mm up to 30mm along with nuts, regular washers and locking washers.
What About M2 & M6 3D Printing Fasteners?
For my printing habits and usages, I really have not run into anything needing M2 & M6 bolts. As mentioned previously, the most common bolt types you will run into are M3 bolts, followed by M4 bolts. That is not to say there are projects that don’t require M2/M6 bolts, just that they are not as common. While I have not personally used these, if you’re looking for some of these bolt types, this M2 Hardware Kit and this M6 Hardware Kit are highly rated and favorably reviewed.
Heat Set Threaded Inserts are Useful 3D Printing Hardware
What good are those nuts and bolts if you can’t screw them into anything? You could always model threaded holes in your actual 3D models, but all things considered, those tend to be pretty weak. That is where heat set threaded inserts come into play. These are pretty useful 3D print hardware pieces to have on hand and are very strong once fully set.
What you do is, use a soldering iron to heat the threaded insert up and stick it into your plastic 3D printed piece. Once the plastic cools, the threaded insert will be set, surrounded by plastic, keeping it bound to the piece and giving your proper threads for your M3/4/5 bolts!
This Heat Set Threaded Inserts Kit has a variety of different sized inserts, ranging from M2 all the way up to M6! These are very good because they have both a clockwise and counter-clockwise spiral pattern that digs into the molten plastic and grips super tight once cooled down. Other types of inserts have parallel line patterns that don’t grip the plastic as well.
Depending on your soldering iron, you will also need some special tips to use when setting the inserts. One of the most common type soldering iron tip is a T18 standard, and these Heat Set Insert Tips fit those. I personally use an ultra-compact and wonderful TS100 Soldering Iron which does not use a T18 standard. Therefore, I needed to order a Special Set of These Tips specifically designed for TS100/TS101 soldering irons.
To make inserting these threaded inserts easier than ever, you could build yourself an Insert Press. Here are a few links to a few popular insert press projects: The Jo Presser and The Stealth Press.
Some 3D Printing Ball Bearings are Very Handy
Ball bearings are used all over the place in 3D printed projects. Specifically, 608RS Bearings, which are often used as skateboard bearings are probably the most commonly used bearing type in 3D printing projects. To put it into perspective, I used a bunch of these 608RS bearings when I was building and installing some Ender 3 Upgrades for my Ender 3 Pro.
If you’re in a pinch and need a bearing real quick, you can also print out some of these Print in Place Bearings. Mind you, these are obviously not as strong as the metal ones and are not intended for anything with any sort of load. But they’re really cool, nonetheless!
Most Common Magnets for 3D Printing
Very similar to ball bearings, 3D printing magnets are extremely common hardware for projects. As with the nuts and bolts, there is really no set standard on the size of magnets you’ll need. I have found that 4mm x 2mm magnets are the most common magnets for 3D printing. In fact, they are usually my go-to when I design projects which need magnets.
Following 4mm x 2mm magnets, 5mm x 2mm seem to be the next most commonly used magnets. This 3D Printing Magnet Variety Pack is a 600 piece collection of 3×1, 4×2 & 5×2 magnets, with each type having 200x packed in. Thankfully, magnets are not very expensive for large quantities of them!
Electronics Projects & 3D Printing Hardware for Them
Electronics 3D printing components are going to be necessary for a lot of DIY projects. Any sort of lighting, motorized, heated, etc. project will need, at minimum, some wire to hook everything up with. You will also find yourself needing some sort of way to give power to your project. The way a lot of projects handle that is by utilizing DC barrel jacks.
Wire is One of the Most Essential 3D Printing Electronics Parts
All electronics projects need wire, be it 3D printed projects or otherwise. This 22 AWG Stranded Wire is perfect for most low-voltage projects and is very durable. I have been using BNTECHGO’s wire for a while and they are my go to. With this wire, you get both a black strand and a red stand together on a 25ft. spool. Technically it is 50ft. of wire, but for most projects, you will be using both the red and black wires together.
Solder Sockets are Fantastic for Splicing Wires
I found about these Solder Seal Wire Connectors a few years ago when I was watching a video on how to replace my Ender 3 Pro’s cooling fan and have been using them ever since. The entire purpose of these connectors is to easily splice together wires without have to solder them, while also giving you a protective shield that is also waterproof!
The way these connectors work is, you put one of the connectors on your wire and the twist both ends together. Then you slide the connector over the twisted area and apply some heat. With heat applied, the connector shrinks up, creating a watertight seal. Also, the solder inside the connector melts onto your twisted wires creating a super strong and secure connection.
Female DC Barrel Jacks for Power
Having some of these DC Barrel Jacks is great for quickly connecting a circuit to accept a power supply, or even for finished projects. In fact, my very own 3D Printed Neon Lights Project uses these exact DC jacks because of how simple they are to work with!
Speaking of how simple they are to work with, there is no soldering required. You only need a Phillips head screwdriver to open/close the terminals. To ‘install’ these, you just open the terminal with the screwdriver and insert the wires in and then tighten the screws to secure the wires. That’s it!
Bonus: Insert Bins for a 3D Printing Hardware Kit
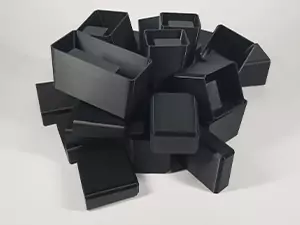
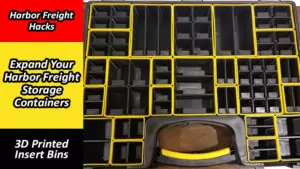
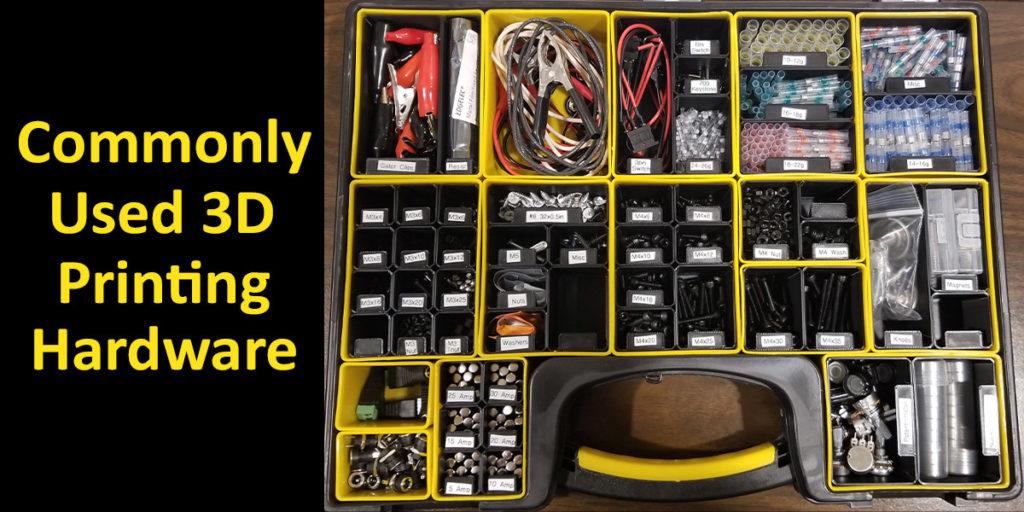
If you noticed the article’s main photo, there is a Harbor Freight storage container with a bunch of black insert bins inside of the yellow parts boxes. These are 3D printed and allow me to better utilize the space inside my storage cases!
Take a look at my Insert Bins for Harbor Freight Storage Cases article for more information and download links to the 3D models! These are exactly what I use in my 3D printing hardware kit to divide everything up.
Final Thoughts on 3D Printing Supplies
That is a wrap on the most beneficial 3D printing hardware parts! Throughout this article, we discussed some of the most beneficial and common 3D printing supplies and hardware to use in your builds. And having a variety of 3D printing hardware on hand will open up a ton of different projects you now have (most of) the supplies to build.
Nearly all designers and creators, including myself, use these fasteners and parts in their projects. If and when you build one of those projects, you will now be prepared. Be sure to checkout my work and keep up with me on Printables, MakerWorld, or Twitter! I hope you have enjoyed this 3D printing supplies, fasteners and hardware article. As always, happy printing!
You May Also Enjoy


