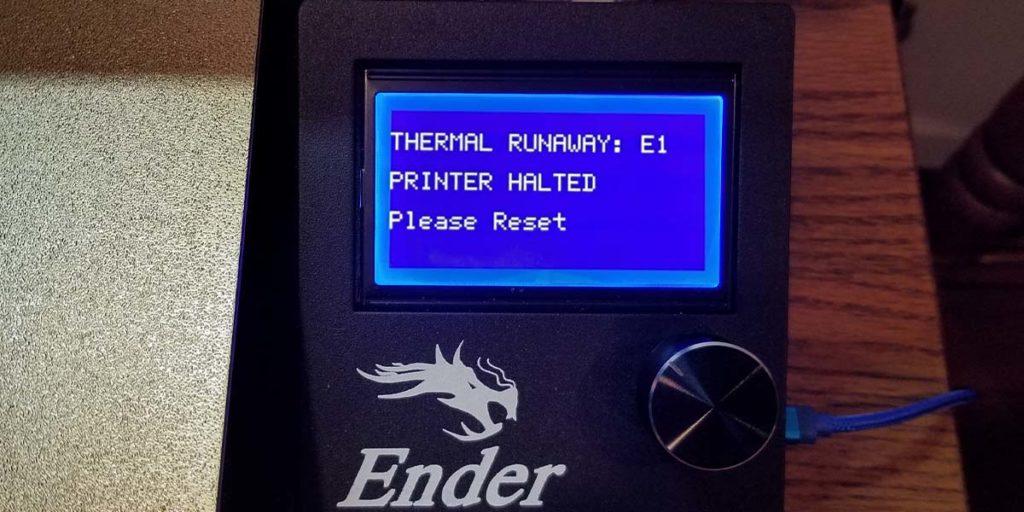
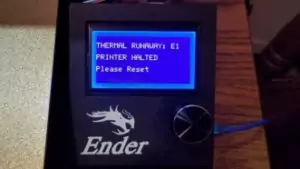
Has you ever seen the Ender 3 Pro Thermal Runaway error message? The dreaded ‘THERMAL RUNAWAY: E1 PRINTER HALTED Please Reset’ error message is a problem that haunts a lot of Ender 3 owner’s dreams. Thermal Runaway on an Ender 3 is basically when the hotend is continuously heating up and doesn’t stay within the set temperature.
The Ender 3 Pro Thermal Runaway error message can be extremely frustrating. This error message will completely derail your prints, and more importantly, potentially cause a fire. But it is not all doom and gloom. Fixing the Ender 3 Pro thermal runaway error can be relatively easy and due to multiple causes. This article will go over some of the most common causes of the thermal runaway error, so let’s start diagnosing and fixing.
Table of Contents
This post contains affiliate links, which means I may receive a small commission, at zero cost to you, if you make a purchase through a link.
What is Thermal Runaway?
Thermal runaway is when something starts generating heat and that heat causes a reaction, in which that reactions generates even more heat. Then another reaction and more heat, over and over and over again. Hence the word ‘runaway’. In regards to 3D printers, thermal runaway is when there is no control over the heating elements and they continually keep heating up, which is not good. This can lead to fires damaging your 3D printer, or worse, burning your home down. If you are seeing the thermal runaway errors, please don’t dismiss them. Hopefully it is nothing too serious, but it is something to be aware of.
Thermal Runaway Precautions
The first thing to do is to make sure you firmware has thermal runaway protection on it and that it is enabled. Chances are your Ender 3 Pro has this enabled already if you are seeing the same error as the article’s main image. But it really doesn’t hurt to double check.
After that, there are a few other precautions you can, and really should, take for dealing with the potential of thermal runaway. Always have a fire extinguisher near your 3D printer. Should a fire break out, having a fire extinguisher close by and quickly accessible can make the difference between putting it out and letting it rapidly spread. Along the same lines, for times when you are not near your printer, you should have a smoke detector near your printer. A smoke detector will alert household members if the printer starts smoking or catches on fire, especially for anyone who is not actively monitoring the printer.
To really maximize your protection, it may be worth surrounding your printer in a flame retardant enclosure. Owners of an Ender 3 Pro (and nearly all other Ender 3 models) may want to look into Creality’s Fireproof Enclosure. This enclosure was designed for the Ender 3 and should a fire actually break out, give you more time to contain it, or hopefully contain itself within the enclosure.
A few additional benefits to this enclosure are keeping it dust-free and also allowing you to achieve higher temperatures, should you want to experiment with different filament types. There is also an optional Fume Extraction Kit for if/when you’re printing with materials such as ABS, ASA, etc!
How to Fix Ender 3 Pro Thermal Runaway Errors
There are many different possibilities as to why the Ender 3 Pro Thermal Runaway errors are happening to you. It could be as simple as your power supply not be set correctly, all the way to your hotend being completely unusable. Let’s go over some of the common issues to help diagnose your Ender 3 Pro’s thermal runaway.
Power Supply
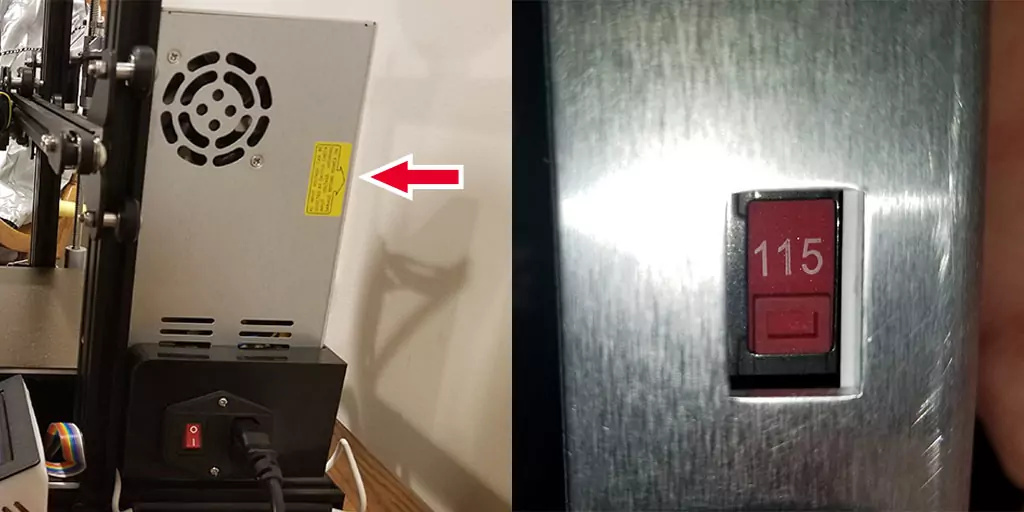
One of the simplest things to check for the Ender 3 Pro thermal runaway error is that your power supply’s voltage switch is correctly set to your country’s standards. For example, the US and Canada use 120v, so the voltage switch should be set to the 115 option. Other countries use 220v, so the voltage switch should be set to 220 for those countries. The switch is found on the skinny backside of the power supply, in the about halfway up in the middle. My power supply has a yellow stick pointing to its location as well. See the red arrow for clarification.
Thermistor
A thermistor is a exactly what it sounds like it is, a thermometer and a resistor, combined together. The resistance changes as the temperature changes. The thermistor is how the Ender 3 can understand how much electricity to send to the hotend to heat it up. Or the opposite, stop sending electricity to cool the hotend down. The hotend’s thermistor is a very important, yet extremely fragile component. With out it, the hotend simply will not function correctly.
Loose Thermistor – This is what caused my Ender 3 Pro Thermal Runaway error
A loose thermistor can cause the thermal runaway error. In fact, when I had the issue, this was exactly the fix to get rid of it. If the thermistor is not properly connected to the hotend, it will have difficulty reading the actual temperature of the hotend. The hotend will have no idea if the amount of electricity it is sending to the heating block is accurate. Mine was a little loose, so all I had to do was tighten up the thermistor set-screw, and my issue was solved. This is such an easy thing to do too. Here is how you can check your thermistor’s set-screw:
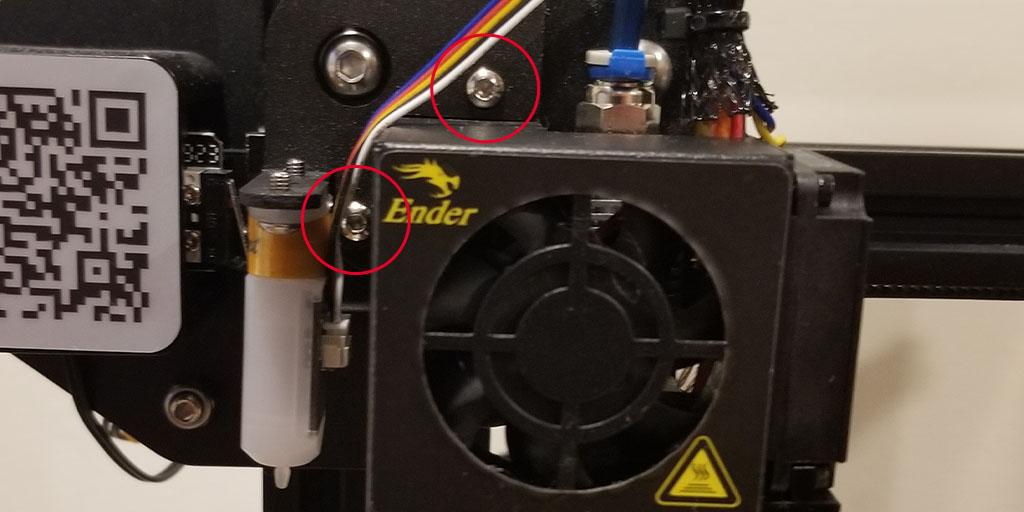
Using the tools provided to you with the printer, remove the two highlighted screws for the fan shroud.
Move the fan shroud out of the way. I place mine on the crossbar and position it so it was stay there. If you have a BL Touch/CR Touch like I do, move it out of the way as well. Next, take a screwdriver and examine the thermistor set-screw as shown below with the red arrow. BE VERY CAREFUL WITH THIS SCREW: you DO NOT want to over tighten this screw, as it will damage the thermistor! You want just barely snug, and I do mean just barely.
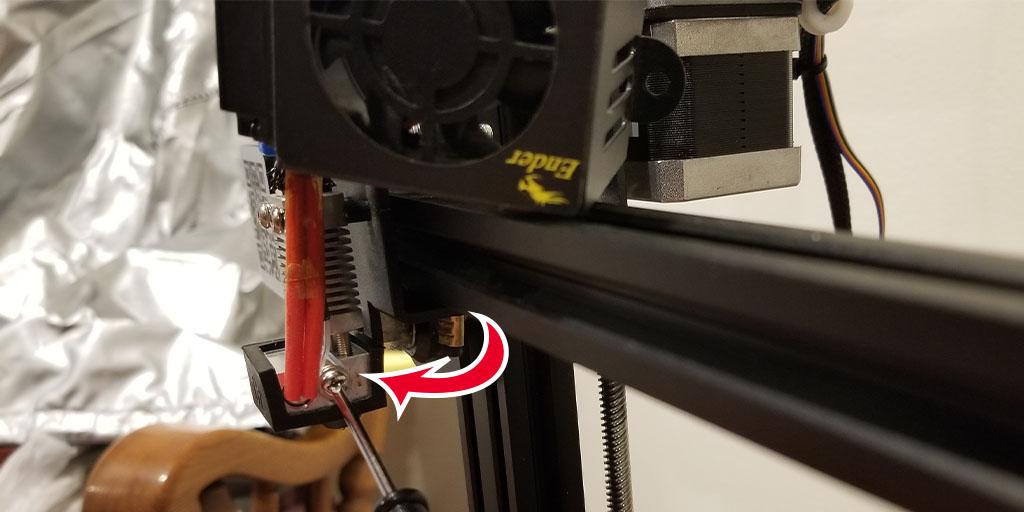
After ensuring the screw is not too tight, but also not too loose, place the fan shroud (and BL/CR Touch if you have one) back and reinsert the screws to button it all up. Afterwards, it is a good idea to run a PID Autotune (found below).
Bad Thermistor
If checking the thermistor set-screw didn’t fix the Ender 3 Pro Thermal Runaway issues, it is absolutely possible that your thermistor is just bad or damaged. It could have worn out over time, came from the factory defective, or have been accidentally damaged by over tightening the thermistor set-screw. If you checked the set-screw and did a PID Autotune and still have the issue, you will want to replace the Thermistor.
It is also not a bad idea to have a few spares on hand too. After all, this is such a delicate part. Changing the thermistor is pretty simple. All you need to do is disconnect the old one from the motherboard and connect the new one in its place. After that, feed the wire through the cable wrap as you pull the old one out of the cable wrap. Then it is a matter of securing it to the heating block by using the set-screw. Again, it should be snug, at best. Reread the Loose Thermistor section if you need more clarification.
PID Autotune
Any time you make any changes to your hotend, you should run a PID Autotune. If you have made any changes to your hotend and not ran a PID Autotune, this could be the reason you are experiencing the Ender 3 Pro thermal runaway errors. A PID Autotune is the configuration that your printer will read to determine when to send electricity to the heating block and when not to, so your heating block gets to and remains at your target temperature.
If you are seeing fluctuating temperatures greater than say 1 or 2 degrees above or below your target temperature while printing, a PID Autotune should fix that. For example, at one point my temperatures where swinging +/- 8 degrees from my actual target temp. A PID Autotune fixed that issue for me and now my temperatures only swing a single degree up or down from my target temp.
The following video is what I used to do the PID Autotune on my Ender 3 Pro in the past. Not only does this video explain in detail about PID Autotunes, it will guide you through the entire process. It may seem intimidating, but it really isn’t too difficult and is a great skill to have so you can troubleshoot issues in the future, should they pop up.
New Hotend
Unfortunately, if all else fails, the most likely culprit to your Ender 3 Pro thermal runaway issues is probably your hotend. It may have come from the factory bad, or just gone bad over time and needs to be replaced. Luckily, it is not the end of the world. If your printer is still under warranty, it would be worthwhile to contact Creality to inquire about getting a spare. If it isn’t still under warranty, you will need to purchase a new Creality Ender 3 Pro hotend. The good news is that they are not too expensive.
Once you have your new hotend, you will need to feed the wires from the new hotend the same way the wires from the old hotend are fed. Then just connect the wires to the motherboard and mount the entire hotend to your printer and you should be back in business. Before attaching the fan shroud, you may want to double check that the thermistor set-screw is right, as mentioned above. Afterwards, it is highly recommended to do a PID Autotune after replacing the hotend.
Final Thoughts
Hopefully this article has helped you diagnose your Ender 3 Pro Thermal Runaway issues and assisted you in fixing it. This can be a very annoying issue, but it is an issue that needs to be addressed immediately to safely use your Ender 3 Pro. Stay safe and happy printing!
You May Also Enjoy







Leave a Reply