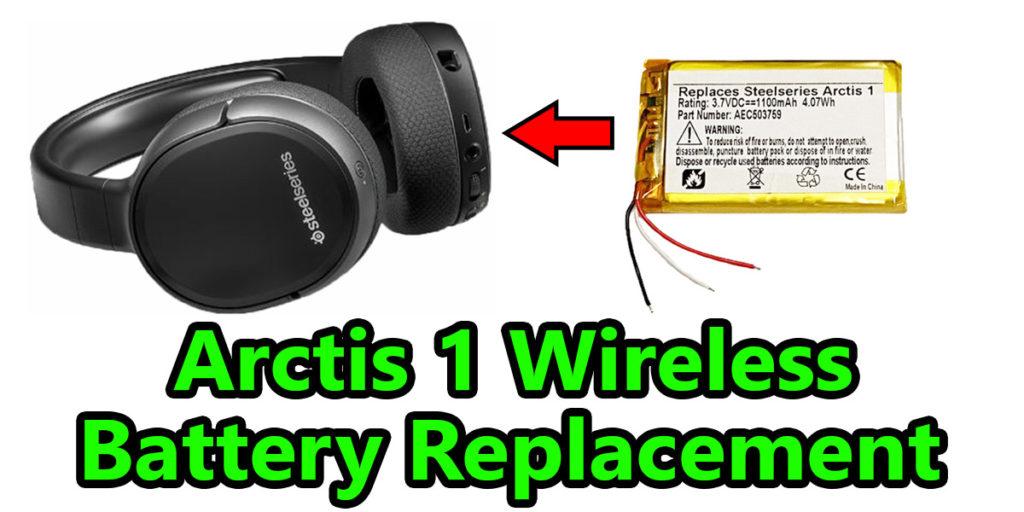
Is your SteelSeries Arctis 1 Wireless Headset is dying after only a few hours of use? If so, it may be time for an Arctis 1 wireless battery replacement. Chances are, your Arctis 1 headset’s original battery is barely clinging to life. For my headset, the original battery was only lasting 2 hours and the battery itself was pretty bloated when I first inspected it.
With my headset’s battery being bloated, I knew it was time for me to replace the Arctis 1 wireless headset battery. With a few tools, parts, and about 30 minutes of free time, I had completely restored my headset back to its original battery life! All-in-all, the Arctis 1 wireless battery replacement was not too difficult. So, if you’re in need of replacing your headset’s battery, follow along with this step-by-step guide!
Table of Contents
This post contains affiliate links, which means I may receive a small commission, at zero cost to you, if you make a purchase through a link.
Arctis 1 Wireless Battery Replacement
I’ve had my Arctis 1 Wireless Headset since February of 2020. Every single day, I use this headset for 12+ hours! Be it for conference calls at work or just listening to podcasts and music. And of course, I use my Arctis 1 headset for gaming and watching movies, shows and YouTube videos. These are the only pair of headphones I own and they have been nothing short of fantastic!
All of this to say, after 3+ years of continuous daily use, it is no surprise the battery started to die. At its worst, the original battery was only lasting 2 hours. That is when I decided it was time to do some surgery on my headset and preform an Arctis 1 wireless battery replacement. I had never done this before, so I had some questions that I researched and have documented my findings below.
Feel free to jump ahead if you just need the tools/supplies and step-by-step Arctis 1 Wireless battery replacement instructions!
Arctis 1 Battery Replacement FAQs
Here are all the initial questions I had when I first started investigating replacing the Arctis 1 battery. I’ve compiled the questions I wanted the answers to along with the answers I found scattered around in a (hopefully) easy to find format.
Can you replace the battery on an Arctis 1 wireless headset?
Yes, the Arctis 1 wireless headset’s battery can be replaced. However, SteelSeries does not offer a battery replacement service or OEM batteries for the Arctis 1 headset. Therefore, you will need to use a third-party battery made specifically for the Arctis 1 headset.
How difficult is replacing an Arctis 1 wireless battery?
Replacing the battery in an Arctis 1 wireless headset is moderately difficult due to having to desolder the old battery and solder the new battery in its place. For anyone who is comfortable with using a soldering iron, replacing the battery in an Arctis 1 headset will be a simple task. Even with little to no soldering experience, it shouldn’t be too challenging.
What tools are need to replace the battery in an Arctis 1 wireless headset?
In order the change the Arctis 1 headset battery, you will need a soldering iron and a Phillips-Head screwdriver. Additionally, tweezers may be helpful for holding the wires when desoldering the older battery and soldering in the new battery. A plastic spudger may also be beneficial when removing the OEM battery, as it is stuck down with double-sided tape.
What type of battery does the Arctis 1 Wireless use?
The SteelSeries Arctis 1 Wireless Headset uses is an AEC503759 battery. This battery matches the OEM battery and has 3 wires coming off of it. A red wire, a black wire and a white wire. These wires should match up with the OEM battery inside of your headset and is a direct replacement. The AEC503759 battery is used in SteelSeries’s Arctis 3 u0026amp; Arctis 7 headsets as well.
The Best Arctis 1 Wireless Headset Replacement Battery
The exact replacement battery I ended up going with is this AEC503759 battery. I ultimately chose this Arctis 1 replacement battery over others because it has a 1500mAh capacity.
The OEM Arctis 1 headset’s battery only has 1100mAh capacity. As mentioned above, this AEC503759 battery is also used in SteelSeries’s Arctis 3 & Arctis 7 headsets.
Arctis 1 Wireless Battery Replacement Tools & Supplies
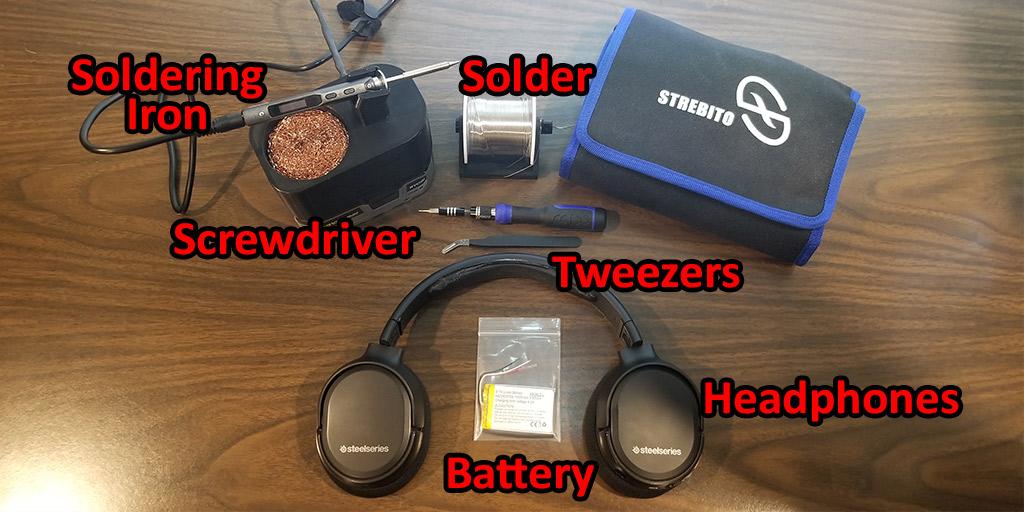
- An AEC503759 battery
- Soldering Iron – The TS101 Soldering Iron is the best soldering iron I have ever used and what I use for any soldering projects
- Solder – 63-37 Solder is my preferred choice
- Small Phillips Head Screwdriver
- Tweezers – optional but extremely helpful
- Plastic Spudger – optional but extremely helpful
The screwdriver, tweezers and plastic spudger I used all came from this really affordable and awesome STREBITO All-in-One Toolkit. I use this toolkit all the time and highly recommend it if you’re in the market. It is much cheaper than an iFixIt kit and in my opinion, is just as versatile!
Steps for the Arctis 1 Wireless Battery Replacement
Once you have acquired all of the required tools and parts, follow these step-by-step Arctis 1 Wireless battery replacement instructions. Be sure to read all the instructions carefully to ensure you don’t run into any issues. Also, use the provided photos as reference to assist you!
Step 1 to Replacing the Battery in an Arctis 1 Wireless Headset
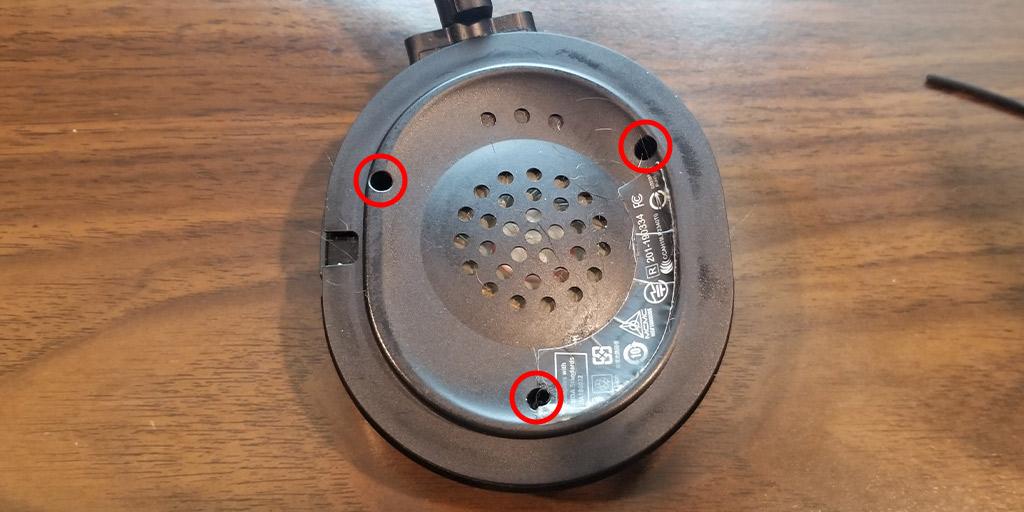
To begin, start by removing the right ear cup’s pad and lay your headset flat on a table, with the speakers facing up. Once it is removed, you should be presenting with just the outer shell.
With your Phillips-Head screwdriver, remove the 3 small screws that are holding the ear piece in place. Use the above photo to pinpoint the exact screw holes. Be careful with the screws as they are very small and are easy to lose!
Step 2 for the Arctis 1 Wireless Battery Replacement
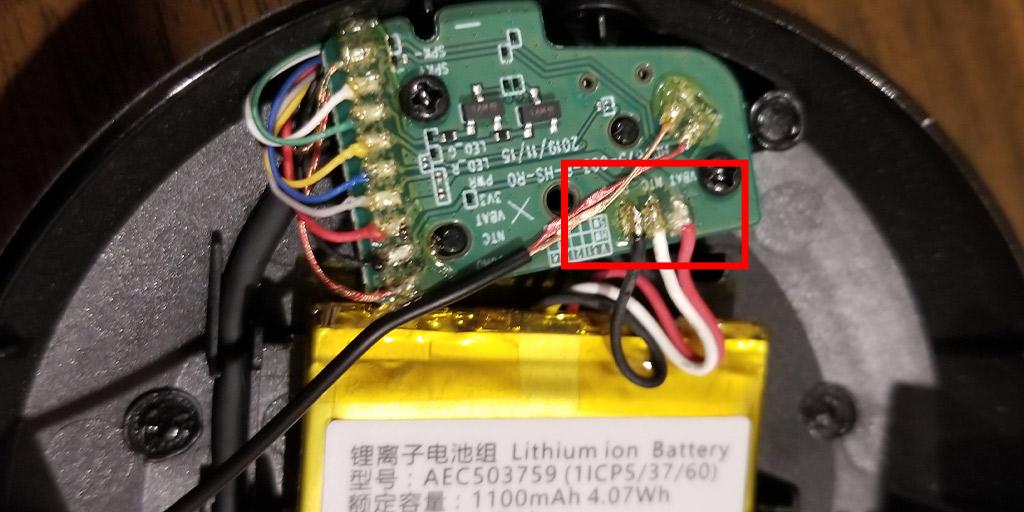
Now that the screws have been removed, you can lift the top portion of the shell from the bottom portion. Carefully examine the wires inside of the shell and then fold the top portion of the outer shell to the side. Make sure to not rip any of the connected wires off of the PCB board.
Once the shell is open, identify the 3 wires from the battery connected to the board. Use the photo above to see the specific wires I am referring to. They are outlined in red. These 3 wires should match your replacement battery’s wires.
Step 3 is Soldering in the New Battery in the Arctis 1 Headset
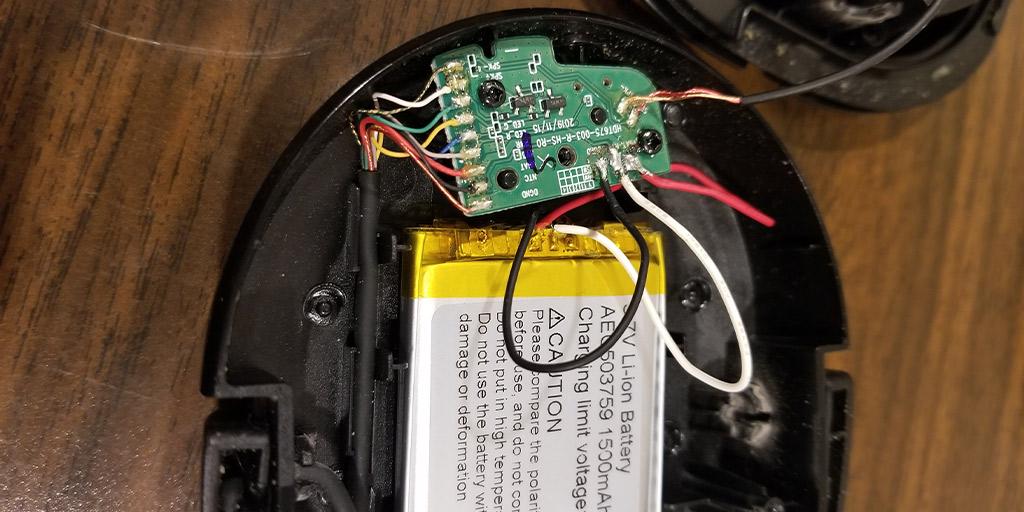
Go ahead and desolder these 3 wires. Be very careful to not short (touch) any of the wires from the old battery together. Just a quick head’s up, the same can be said for the new battery as well.
Once the OEM battery has been desoldered from the board, you will need to separate the battery from the bottom portion of the ear piece’s shell. It is held in place with some double-sided tape. Be careful to not puncture the battery when doing this! I used one of the plastic spudgers that my all-in-one toolkit came with, mentioned above.
After removing the old battery, take the new battery and place it in the same spot within the shell. I didn’t bother with gluing/taping it down. If you’d like to, feel free, but I haven’t had any issues. Once again, be extra cautious to not let any of the new battery’s wire touch each other! Go ahead and solder the new wires on to the board where the older wires were.
If you are not super comfortable with soldering, adding some solder to your soldering iron’s tip can make soldering the wires easier. After 3 quick solder-jobs, your battery should be fully connected! As you can see in my photo above, it ain’t pretty, but my new battery is in and ready for testing.
Final Step to Replacing the Arctis 1 Wireless Battery
The last step in the Arctis 1 Wireless battery replacement process is to test everything out and reassemble it. With the battery and wiring still exposed, go ahead and turn your headset on to make sure it is working as expected and that everything is soldered properly.
If your headset is working like normal, slap the top portion of the outer shell back into place and button it up with those 3 screws. Congratulations! You have finished replacing the Arctis 1 headset’s battery.
Final Thoughts on the Arctis 1 Wireless Battery Replacement
Overall, an Arctis 1 wireless battery replacement is a straightforward and relatively simple project. The only hitch you may have is with the soldering need to replace the Arctis 1 battery. With the right tools and a replacement battery on hand, this can take as little as 10 minutes to complete!
Thanks for sticking to the end and if you have any questions, leave a comment below. You can always catch me on Twitter and if you’re into 3D printing, be sure to checkout my work on Printables and MakerWorld! Happy repairing!
You May Also Enjoy






Leave a Reply