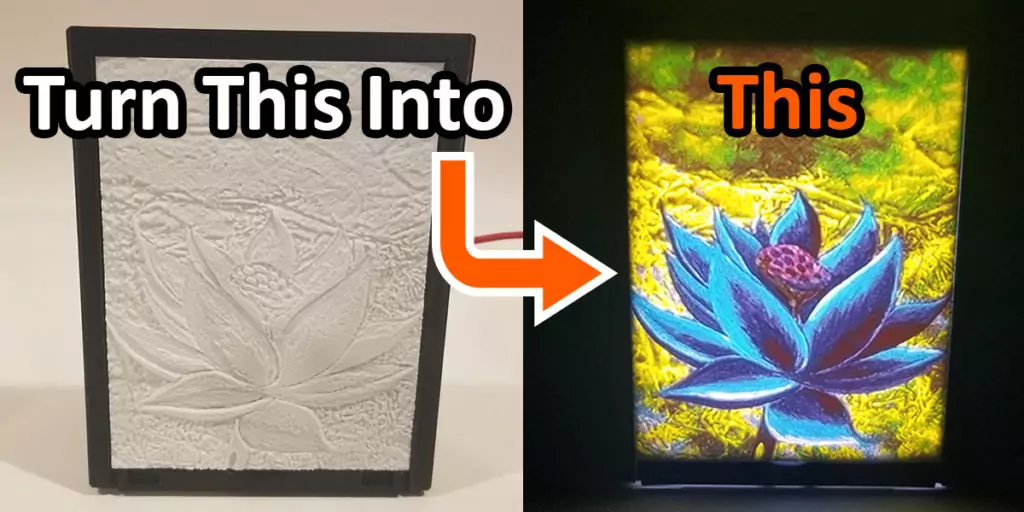
A recent project I undertook was a 3D printed lithophane lamp. For this project, I wasn’t looking for a plain black and white lithophane. No, I wanted one in color that was bright and vibrant. That is where my Bambu Lab X1 Carbon came to the rescue and I was able to created this amazing color photo and stick it in a 3D printed picture frame.
Creating a 3D printed lithophane lamp is not all that difficult, so long as you know exactly what you need and how to do it. You will need a 3D printed picture frame, a diffuser plate, an LED panel and the actual 3D printed lithophane itself. This simple, yet stunning DIY project will help you use your Bambu Lab printer to its fullest potential and create your very own (color) 3D printed lithophane lamp in no time!
Table of Contents
This post contains affiliate links, which means I may receive a small commission, at zero cost to you, if you make a purchase through a link.
3D Printed Lithophane in Color
This 3D printed lithophane lamp project utilizes the amazing capabilities of the Bambu Lab X1 Carbon and the AMS for multi-color printing. The AMS is really the key component here. It allows us to have four filaments of specific colors (cyan, magenta, yellow & white) to get highly detailed and gorgeous 3D printed color photos. Take an ordinary photo and turn it into a vibrant lamp with next to no effort! Here is the order we will do things to complete our 3D printed lithophane lamp:
- Create the lithophane plate STL files
- Gather all the other downloads, parts and filaments
- Print the lithophane plate
- Print the diffuser plate and the 3D printed picture frame
- Assemble the 3D printed lithophane lamp
Creating the 3D Printed Lithophane Plate
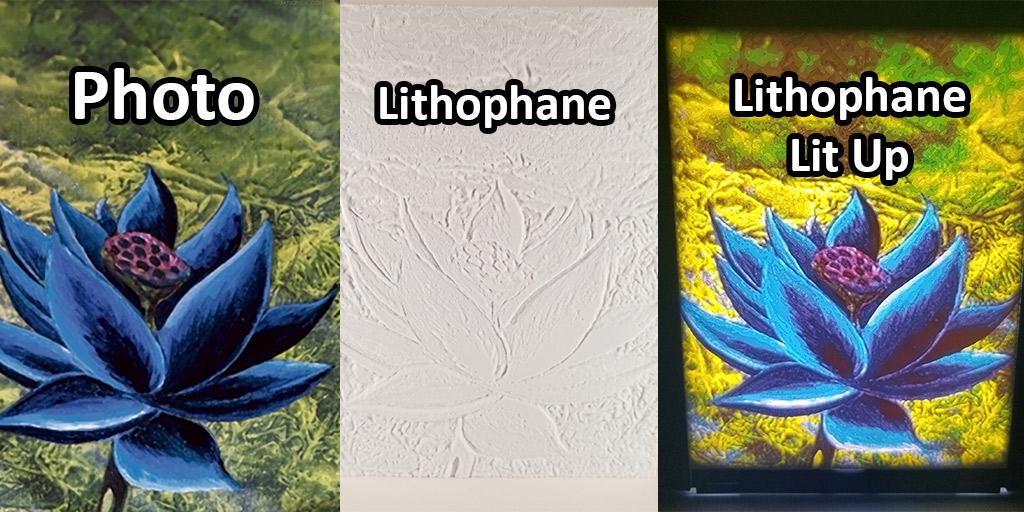
At this point, you may be wondering, ‘Your color lithophane is cool and all, but how do I make my own?’ Well, I’ve got you covered on that. The first step is going to be securing your source photo. Basically, the image that you want your 3D printed lithophane to be of. For example, in the photo above, I found a nice piece of artwork and used that for creating my color lithophane.
Once you have your photo, determine the orientation of your lithophane. For example, I wanted mine to be in a vertical orientation. You may need to edit the photo slightly, depending on the size/resolution of your source photo. Then head over to LithophaneMaker’s Color Lithophane Creator and follow these instructions for creating the STL files so you can print yours out.
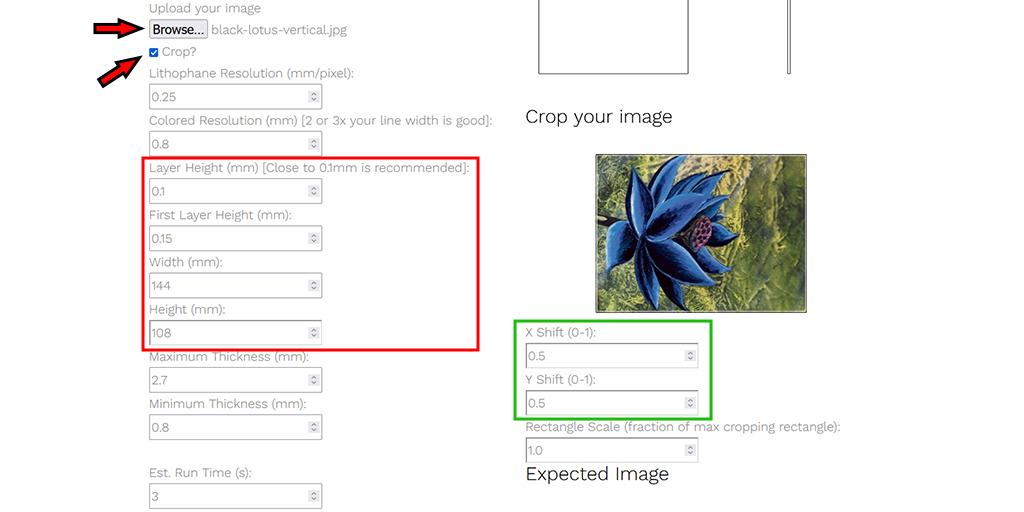
Take your source photo and upload it to LithophaneMaker. Enable the Crop checkbox and then on to the important settings. Make sure the Layer Height is set to 0.1. The First Layer Height should be set to 0.15. Finally, set the Width to 144 and the Height to 108. Double check that all of your settings match mine and then fine tune the image’s position with the two boxes highlighted in green.
Changing those values will move the your uploaded photo. Play with these two boxes until you have your photo positioned how you like. Once you like the photo’s positioning and all of the other settings match mine, go head and scroll down to supply an email address and download the STL files it generates. Now that you have the STL files for the actual lithophane plate, it is time to gather all of the other downloads, parts and filaments.
Supplies Needed for this 3D Printed Lithophane Lamp
In order to create a beautiful 3D printed lithophane lamp (in color!) you will need a few supplies. Fortunately, the only non-3D-printing part needed is an LED panel. Everything else can be printed, assuming you have the correct filament types and colors. If not, I have a listed a few different options from manufacturers that I have personally used and never had issues with. To kick things off, you will need a 3D printed picture frame to house everything.
A 3D Printed Picture Frame
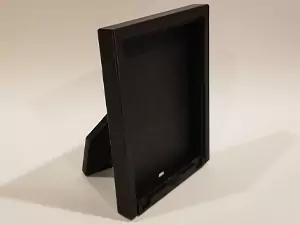
The first thing you will need to create your 3D printed lithophane lamp is a 3D printed picture frame. As mentioned above, the frame shown in the photo has been designed to house all the pieces together in a neat little package. There is a slot for the LED panel to lock into, a locking slot for the light guide/diffuser plate and a pressure-fit space for the actual 3D printed lithophane itself to securely clip in.
The frame has a built in arm that swings open and close to keep the frame standing. The arm works both horizontally and vertically, depending on your photo and preference. The really cool thing is that the arm and the hinge are print-in-place, meaning once the print is finished, it will just work without any extra parts or assembly. This 3D printed picture frame measures 126mm wide and 162mm tall when in a vertical orientation.
Printing Instructions for the 3D Printed Picture Frame
When printing this frame, especially when using for colored lithophane plates, darker colored filaments work best. I opted to print mine in black PLA. For printing the frame, I used the standard 0.4mm sized nozzle and printed it at a layer height of 0.2mm. For the best results, I chose to go with 50% infill for this 3D printed picture frame. I also used a brim and enabled tree supports for the top of the inside of the frame. If you have a Bambu Lab printer, I have a PLA print profile created that you can use from MakerWorld, 3D Printed Picture Frame for Lithophanes.
| 3D Printed Picture Frame Download | Creator | Est. Print Time | Filament |
|---|---|---|---|
| Download for Bambu Lab Printers | TheMakerSphere | ~5 hours | PLA (dark color) |
| Download for All Other Printers | TheMakerSphere | ~5 hours | PLA (dark color) |
LED Diffuser Plate That Slides into the 3D Printed Picture Frame
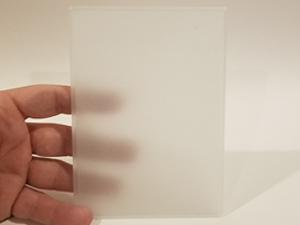
The next part of our 3D printed lithophane lamp is the LED diffuser plate/light guide. This plate slides into the 3D printer picture frame and locks into place. The primary purpose of the diffuser plate is to distribute the lighting from the LEDs evenly throughout rather that focused from each individual bulb. A secondary purpose is that this plate acts as a firewall/heat shield between the LEDs and the lithophane plate.
PLA is very sensitive to heat and begins to softens at 60c and your lithophane plate will (probably) be made from PLA. For this reason, I printed my LED diffuser in Bambu’s Transparent PETG. Not only will it not deform from the heat the LEDs generate, but being translucent, it allows more light through and makes the color lithophane brighter and more vibrant.
Printing Instructions for the LED Diffuser Plate
Again, I’d highly recommend printing the diffuser plate in PETG. All other parts, including the 3D printed picture frame, can be printed in PLA. If you don’t have transparent PETG, you can print it in white PETG. There is a noticeable difference in the brightness of your 3D printed lithophane lamp because the white diffuser will end up blocking more light compared to a translucent diffuser.
For the LED diffuser plate, I printed it using my 0.4mm nozzle at a layer height of 0.2mm. I configured my slicer to have 5 walls along with 5 top layers and 5 bottom layers. This should result in a completely solid piece without any infill. Please note, you actually do not want any infill because that infill pattern will cast shadows on your lithophane when lit up.
| 3D Printed LED Diffuser Plate Download | Creator | Est. Print Time | Filament |
|---|---|---|---|
| Download for All Printers | Bambu Lab | ~30 minutes | PETG (transparent is best) |
LED Board That Fits into the 3D Printed Picture Frame
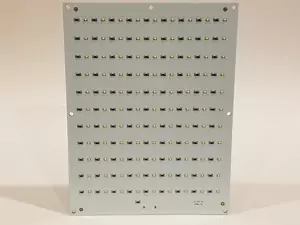
The next component of the 3D printed lithophane lamp is going to be the light source. Shown in the photo is an LED panel by Bambu Lab that was specifically designed for the 3D printed picture frame detailed above.
Since it was designed for that frame, it slides in from the bottom and locks in place so it won’t slip out.
There are a 9 rows of 11 LEDs totally 99 individual lights. There is also a single little straggler LED at the bottom bringing the grand total of LEDs to 100 for this panel. The panel has a USB type C port to power it and uses 5W (watts) of power. The next section will cover filaments needed and if you’re looking to save a few bucks, Bambu Lab does have a combo deal with the filament and the LED board together.
A Color 3D Printed Lithophane Lamp Needs CMYK Filament
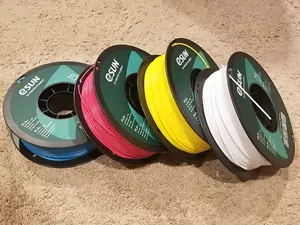
In order to print color lithophanes, you will need to appropriate colored filaments. Just like a regular paper color printer needs cyan, magenta, yellow and black ink, your 3D printer will need cyan, magenta, yellow and white filament.
There are two different filament options you can go with, Bambu filament and eSun filament.
As mentioned previously, you can opt for the Bambu CMYK Bundle that comes with the LED panel included along with the 4 spools you will need. Alternatively, you can just go with the Bambu CMYK Filament package which just includes the 4 spools you will need.
The last option is what I ultimately chose, eSun, as you can see in the photo. While these colors are not a package made for 3D printing lithophanes, I found they worked really well and came out a bit cheaper due to eSun being on sale at the time. The exact filaments I used are eSun’s PLA+ in the following colors: W-Light Blue (for cyan), K-Magenta, P-Yellow, and A-Cold White.
If you are printing your lithophanes on a Bambu Lab printer and using the AMS, be sure to put your filaments in the correct order. Starting from the left, moving right, you will want Cyan first followed by Magenta, Yellow and finally White in the final slot. The best part about these filaments is that the cyan, magenta and yellow filaments will last a LONG time. You can get dozens of lithophane plates from just these single spools *
* You will end up using 3-4 (maybe more!) spools of white before you exhaust the cyan, magenta and yellow spools since the 3D printed lithophane plates use much more white than any other of the colors
Printing the Color Lithophane Plate
Now that we have the color lithophane plate created, have secured all of our files, parts and filaments, it is time to move on to the slicing side of things for the lithophane plate! Open up Bambu Studio, create a new project, and drag and drop all of your files together inside it. You will prompted popup that says ‘Load these files as a single object with multiple parts?‘ Be sure to click the Yes button.
The next step is to set the build plate and the nozzle. I used the smooth side of my PEI plate I mentioned in my Must Have Bambu Lab X1C Upgrades article. From what I understand, a textured surface is not ideal for the 3D printed lithophane plates because it can create unwanted shadow’s from the light projecting behind it. Long story short, use some sort of flat surface as the build plate.
last thing in regards to printer parts, to get the super fine details, a 0.2mm nozzle is best and what I personally use for my lithophane plates. I have an X1C so I use this 0.2mm nozzle. If you have a P1P or P1S, you will need to use this version of the 0.2mm nozzle. All that being said, a 0.4mm nozzle certainly works, but you will lose some of the photo’s crispness, resulting in a slightly blurry photo.
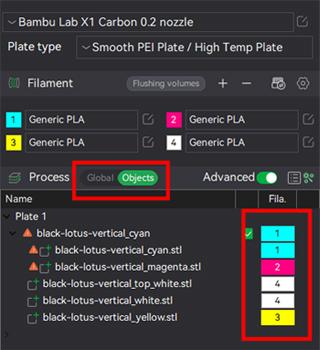
Now go ahead and set the quality for your print. You will want to use a 0.1mm option. The next step is to assign the colors to each STL of the lithophane. Refer to the image and go to Objects options. Here you can see each individual STL and assign a color to each one. Each file’s name will have the color it should be assigned, so proceed to assign the colors.
Where you just selected Objects, go back to Global and within the Quality tab, set the Layer Height to 0.1. Just under that option is the First Layer Height. We want to set this value to 0.15.
Next, move on to the Strength tab. Here we will set both the Top Shell Layers and Bottom Shell Layers to a value of 3 for both. Scrolling down a bit in the Strength tab, identify the Sparse Infill Density option and set the value to 100%. Directly below that is the Sparse Infill Pattern which you should set to Rectilinear. Rectilinear. This will ensure you lithophane plate has no infill in it which would cast shadows once the LED shines on it otherwise.
The last setting we need to change is located under the Speed tab. Identify the Slow Down for Overhangs checkbox and make sure it is NOT checked (unchecked). When you are finished with all of the slicer settings, your screen should look similar to mine, depending on what nozzle size you used, of course. Go ahead and slice the plate and print it out. Just a quick warning, slicing will take a very long time, like literally minutes to finish. Mine took about 4 minutes to slice.
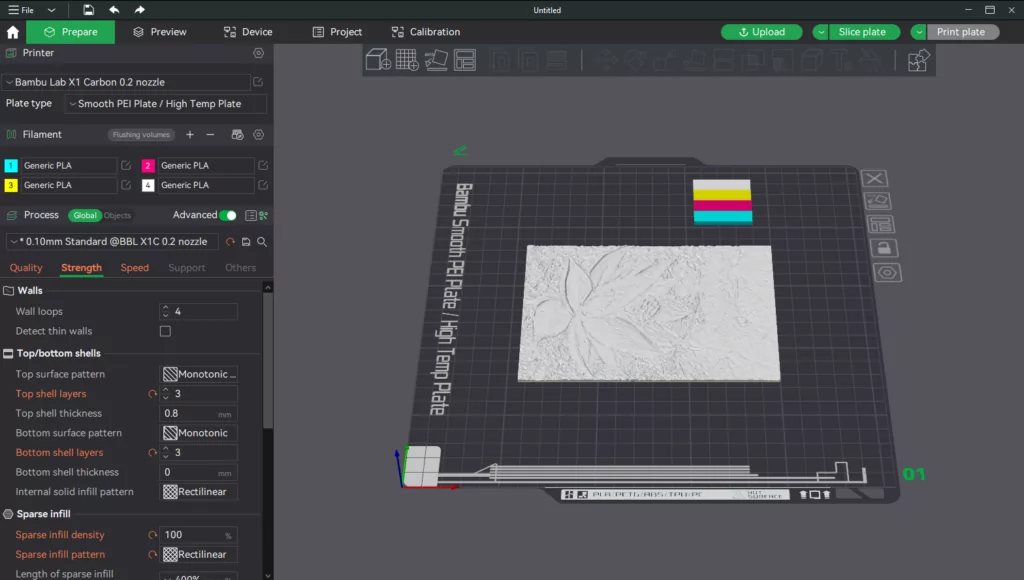
Don’t be alarmed, but a color lithophane plates takes quite a bit of time complete as well. This is especially true when using the 0.2mm nozzle. As a reference, my Lotus lithophane plate took 10 hours to complete. Once your lithophane plate is finished printing, it is time to assemble the 3D printed lithophane lamp!
Assembling the 3D Printed Lithophane Lamp
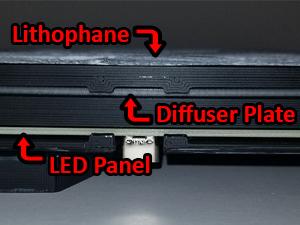
If you have not done so already, it is time to print the diffuser plate and the 3D printed picture frame mentioned above. The frame itself is very easy to assemble.
Just slide the LED panel in from the bottom on the back-most slot until it clicks into place. Do the same for the diffuser plate in the front-most slot. It should also click into place.
Finally take your 3D printed lithophane plate and snap it into place on the front of the frame. There are grips built in to the frame to hold the lithophane plate secure on the frame. Use the photo for reference if you’d like more clarification. That is really all there is to it. Once the frame is full assembled, grab a USB type C cable, plug ‘er in and watch the magic happen!
My Assembled 3D Printed Lithophane Lamp
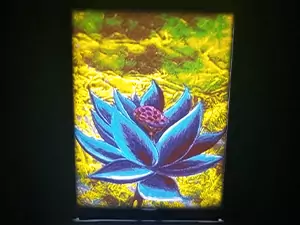
If you followed all of the instructions correctly, you should have something with the similar quality as my Black Lotus lithophane, shown in the photo. The picture really doesn’t tell the whole story. This is so vibrant in real life.
If you are interested in printing your own Lotus lithophane, check out the download links below!
Once again, I printed mine using a 0.2mm nozzle and the amount of detail is incredible. It is almost a cliche to say, but the photos do not do this lithophane lamp justice. It is so stunning seeing it lit up in person. It is brightly lit, but not blinding and certainly not bright enough to illuminate an entire room. It is the perfect amount of light. My expectations were blown away with how well this turned out once when everything was all said and done.
| Black Lotus Lithophane Download | Creator | Est. Print Time | Filament |
|---|---|---|---|
| Download for Bambu Lab Printers | TheMakerSphere | ~10 hours | PLA (CMYK) |
| Download for All Other Printers | TheMakerSphere | ~10 hours | PLA (CMYK) |
Final Thoughts
I hope this article has helped you with creating your very own simple, yet stunning 3D printed lithophane lamp. Assuming you already have all of the filaments on hand, the only ‘part’ needed for this project is the LED panel. The 3D printed picture frame, LED diffuser plate and the lithophane panel will be created by your machine.
If you end up making your own 3D printed lithophane lamp, please be sure to share photos of them with me! Share your photos in the comment section below or share them with me on Printables, MakerWorld, or even Twitter! Thanks for reading and sticking to the end. I hope you have as much success as I had and wish you nothing but happy 3D printing!
The Black Lotus artwork was done by Christopher Rush.
You May Also Enjoy







Leave a Reply