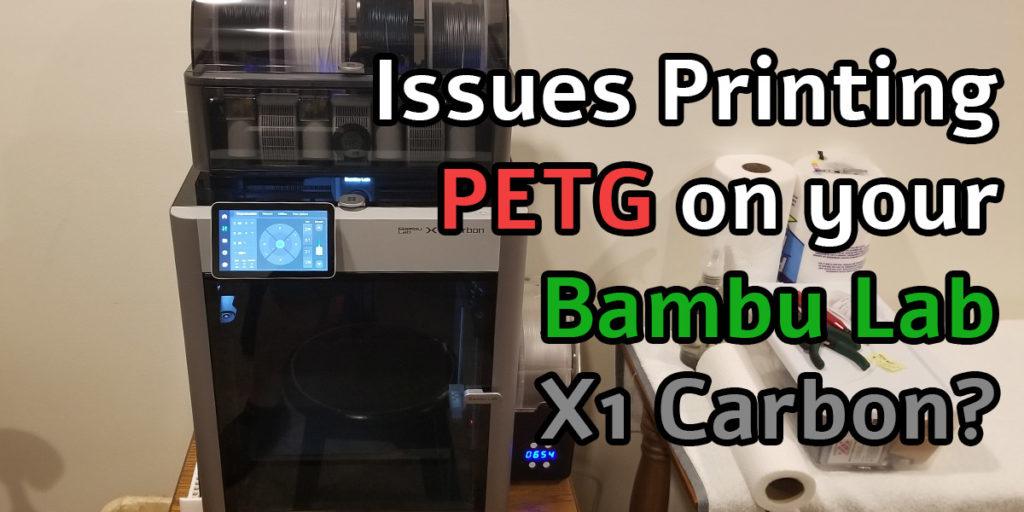
A lot of folks have issues with the default Bambu Lab X1 Carbon PETG settings right out of the box. When I first got my Bambu Lab X1C, I could not print PETG. Not at all. The major issues I was having were no bed adhesion, particles scattered everywhere, stringing, you name it. On the rare occasion prints stuck to the build plate, the first layer had gaps between all the lines. It was awful.
Luckily I found some excellent suggestions and tweaked my Bambu Lab X1 Carbon PETG settings and am now printing absolutely perfect prints, every single time. The key is to find the right temperature and speed to set your printer at during all PETG prints. If you are having issues with printing PETG on an X1C, follow along and perfect your Bambu Lab X1C PETG settings with this handy guide!
Table of Contents
This post contains affiliate links, which means I may receive a small commission, at zero cost to you, if you make a purchase through a link.
Benefits of Printing PETG
PETG is a great material in the 3D printing world. It is touted as being as easy to print as PLA with some of the strengths of printing with ABS without any of the weaknesses associated with ABS. In regards to PLA, it is very rigid and also somewhat brittle. ABS is a very strong material.
For example, LEGOs are made from ABS and those little bricks could probably survive a nuclear fallout! But ABS is very prone to warping and gives off nasty fumes and VOCs (Volatile organic compounds) when it is molten.
PETG is not nearly as rigid as PLA, being much more flexible, and nowhere close to as brittle either. It is also much less prone to warping and does not emit anywhere near the levels of VOCs when compared to ABS. These reasons are why PETG is a favorable material to use for 3D printing.
There are a few things to be aware of when printing with PETG, though. PETG requires a higher temperature on the hotend than PLA does and in the case of a Bambu Lab X1 Carbon, needs to print slower than PLA as well. That is where properly tuning your Bambu Lab X1 Carbon PETG settings comes in to play.
Prerequisites to Changing the Bambu Lab X1 Carbon PETG Settings
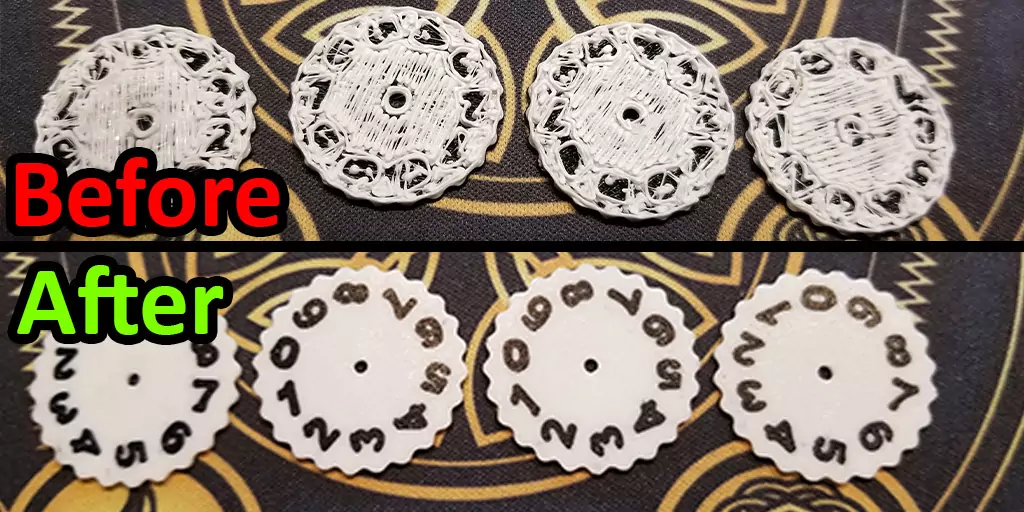
If you follow this guide, heeding the prerequisites mentioned below, while additionally adjusting your Bambu Studio settings, you’ll be printing perfectly with PETG in no time. For a reference, on the rare occasion that a PETG print ‘finished’ for me, it came out just like the ‘Before’ portion of the photo above. After tuning my Bamb X1 Carbon PETG settings, I was (and still am!) getting FANTASTIC PETG prints, every single time, as noted in the ‘After’ portion of the above photo.
Before you change the Bambu Lab X1C PETG settings, you will want to make sure of a few things. To get really good prints, first you will want to make sure your PETG is dry. After that, make sure the build plate is clean and free of fingerprints and oils. It may not seem like much, but these are very important factors to ensuring your prints turn out great.
Dry Your PETG – Seriously
If you have done any reading or research on 3D printing, one of things you will constantly run into is folks recommending filament drying as the first step to troubleshooting printing issues. If you are just using PLA, that really isn’t a big deal, unless you live in the Amazon Rainforest that is. Once you graduate to more ‘advanced’ filaments above PLA, it really does become a concern.
So before anything else, make sure your PETG is dry. I cannot stress the enough, seriously. It really does make a difference. PETG is very hygroscopic and will suck up moisture all day which causes awful printing issues. Eliminating the moisture is key to perfect PETG prints! The ideal settings to dry PETG are letting it ‘bake’ at a temperature of 55c for 8-12 hours. Even after drying it once, PETG can reabsorb moisture over time, so don’t be shocked if you need to dry an older roll out that has already been dried in the past.
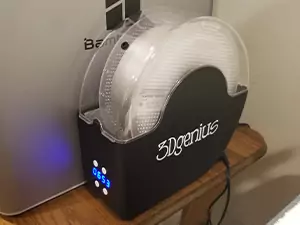
A really good filament dryer will ensure your PETG (and other hygroscopic materials) are dry when you are ready to use them. I recommended this specific 3Dgenius Filament Dryer in my Essential Bambu Lab X1C Upgrades article because it just works, and works very well. It is very affordable and with just 8-12 hours, depending on the material, your filament will come out dry and ready to print.
Unlike a lot of other filament dryers out there, the 3Dgenius filament dryer has a heater that can go all the way up to 70c. Not only that, it also has a built in fan that circulates the air to help with the drying process. Other dryers in the same price range as the 3Dgenius have weaker heaters and no fans to assist with circulation.
The only ‘negatives’ are that it can hold just a single spool at once and it is certainly not quiet. But, my Bambu Lab X1C is not in the room I sleep in so the noise the fans make doesn’t matter to me. Like I said previously, the fans are one of the main reasons I specifically chose this filament dryer over other models.
A Clean Build Plate Goes a Long Way
As trivial as it may seem, having a clean build plate can make or break a print, quite literally. If your build plate has smudges or oils from your fingers, that is a recipe for having adhesion issues. Those smudges and oils create a barrier between the build plate itself and your print which causes the print to not stick properly. Bambu suggests cleaning your build plates with dish soap and warm water.
I personally don’t do this except for the initial cleaning of the build plate before its first print. After the first cleaning, I just use Isopropyl Alcohol and a paper towel onward. This cleans my build plate great and I do it after each print. The only times I have had adhesion issues, be it PETG (after tuning my Bambu Lab X1 Carbon PETG settings) or any other filament, was when I did not clean my build plate.
Bambu Lab X1 Carbon PETG Settings
To start things off, I am currently using two spools of Bambu’s PETG Basic (black & grey) and a spool of eSun’s PETG Solid (white). Within Bambu Studio, I was just using the default Bambu Lab X1 Carbon PETG settings thinking it would work without any hassle. Well, I was 100% wrong with that assumption. I could not get any prints to finish successfully.
In fact, out of the handful I tried, only one actually ‘finished’ and it was a disaster. See the ‘before’ photo from above to see what I mean… In the end, I did some research and some tinkering on my own and found the perfect Bambu Lab X1 Carbon PETG settings, and now my prints come out flawlessly.
Just to reiterate, before making any changes to your Bambu Lab X1C PETG settings, make sure your PETG is dry... Like bone-dry. That is probably the most important factor in having excellent prints vs. failed/mediocre prints!Bambu Studio PETG Settings
The default profile in Bambu Studio for Bambu’s own PETG filament is not good. It runs far too fast and a bit too cool on both the bed and hotend for PETG. Create your own profile with these Bambu Lab X1 Carbon PETG settings and you’ll be printing perfect in no time! Up first are the Bambu Lab X1 Carbon PETG Settings for the filament.
Bambu Lab X1 Carbon PETG Settings for Filament
To really fine tune your Bambu X1C PETG settings, you will need to adjust your temperatures. First, you will want to select the Bambu PETG Basic @ BBL X1C profile and then start making your modifications. Even if you are not using Bambu’s own filament, these suggested changes should be good for generic (non-Bambu) PETG filaments.
After you have completed your changes, save this profile as a brand new one with a name. For example, when I created mine, I named it Bambu PETG Basic @ BBL X1C – Mine so I knew it was based off of the original Bambu PETG Basic profile.
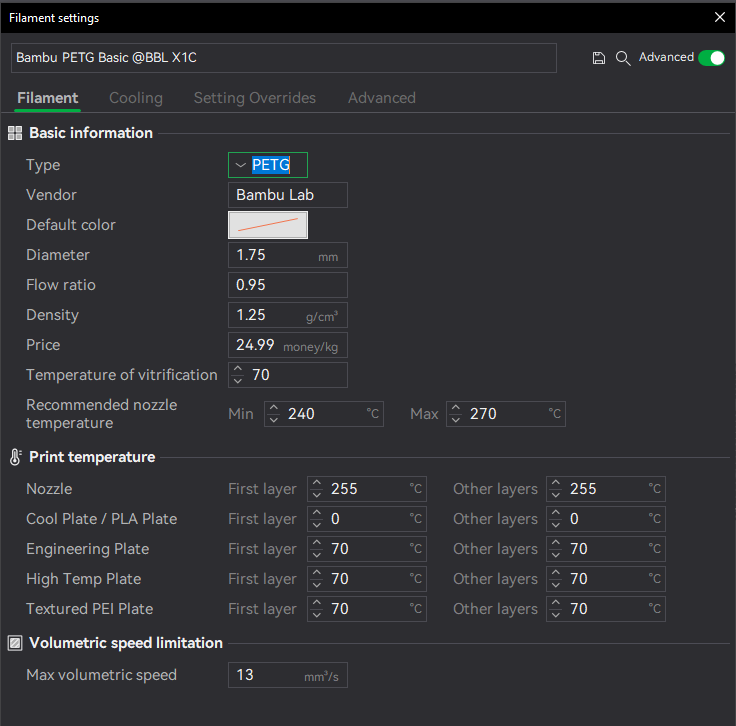
Default Filament Bambu Lab X1 Carbon PETG Settings
My Filament Bambu Lab X1 Carbon PETG Settings
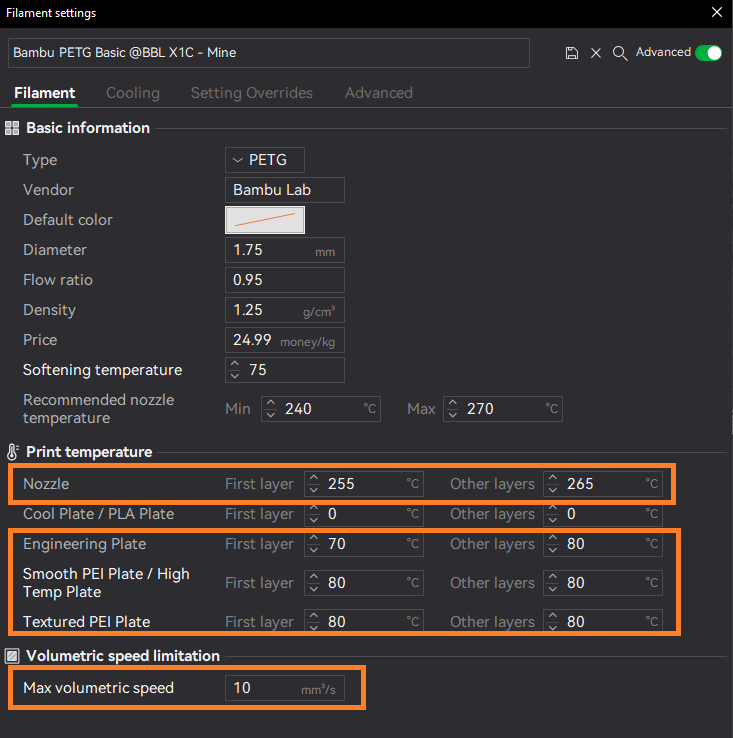
Within the filament settings, you should change the Nozzle temperature from 255 to 265 and the Plate temperature that you use from 70 to 80. This will ensure the PETG is hot enough to flow at the increased speeds the X1C can produce and also has good bed adhesion. You will also want to bump down the Max volumetric speed to 10 or 11.
Bambu Lab X1 Carbon PETG Settings for Printing
After you have modified your Bambu Lab X1 Carbon PETG settings for the filament, you will next want to modify the Bambu X1C PETG settings for the print profile. While I was making these changes for PETG, I modified the 0.20mm Standard @BBL X1C profile and named it 0.20mm Standard @BBL X1C – PETG so I knew it was based off the original profile and was for PETG use only.
Default Printing Bambu Lab X1 Carbon PETG Settings
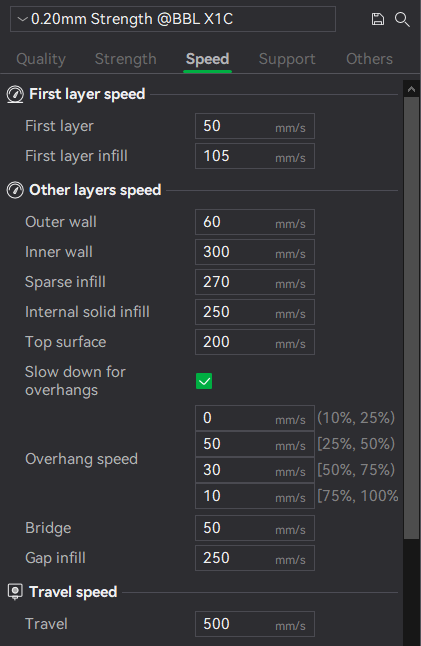
My Printing Bambu Lab X1 Carbon PETG Settings
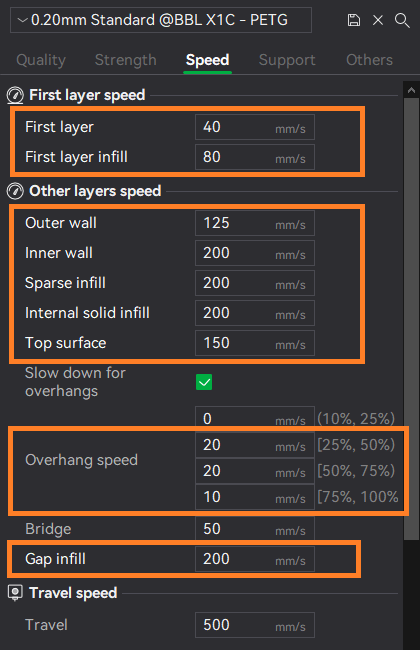
The speed changes on the printing profile are what will really improve your PETG prints. As mentioned above, the default profile is way too fast for PETG. Slowing things down will result in excellent prints. Even with decreasing the speed values, this is still a super fast printing profile. Comparing the ‘slower’ profile to my Ender 3 Pro, it is a night and day difference. A print on the Ender would take 7 hours. On the Bambu Lab X1C, it takes just under 3 hours.
In addition to those changes, I would also recommend updating the Wall Generator from Classic to Arachne. You can find this setting under the Quality tab, towards the bottom. I personally have had better prints using Arachne as opposed to Classic. If you are unsure of this change and want to educate yourself, you can read all about it here: Arachne vs Classic. Long story short, there are pros and cons for each option, but I ultimately chose Arachne.
The only other setting I changed was the Sparse Infill Patterns from Grid to Gyroid. This setting is found on the Strength tab, about half way down. Using the Grid infill pattern can cause the nozzle to ‘chip away’ some of the previously printed material when it crosses over lines. If you have ever noticed small bits scattered on your build plate, chances are this is the reason why. A Gyroid infill pattern greatly reduces that risk.
Build Plates & Your New Bambu Lab X1 Carbon PETG Settings
Now that we have updated and fine-tuned our Bambu Lab X1C PETG settings, I wanted to briefly talk about build plates. For almost any material, I recommend using either a smooth or textured PEI plate. That recommendation changes for PETG. In fact, I have actually found the Engineering plate to be the best of the bunch. I have had literally zero adhesion issues with these optimized Bambu X1 Carbon PETG settings and the Engineering plate.
One word of caution, I would highly recommend NOT using a Smooth PEI plate with PETG, unless you use glue on it. I completed a print on a raw Smooth PEI plate and the PETG was so stuck down, it actually ruined the plate. When I removed the PETG, the PEI coating come up with it. Oopsies 😉. Learn from my mistake so you don’t have the same issue!
Bambu Lab X1C Speed Modes
The last point I want to touch on is the Speed Mode on the printer and in Bambu Studio. For PETG, you will want to stay on the Standard option. As great as Sport and Ludicrous mode are, PETG is just not really meant to be printed that fast. In fact, for more detailed prints, you may even want to dip down into Silent mode.
The slower speeds will ensure the overhangs, bridging and fine details come out perfectly. I tend to stay in Standard mode most of the time, only dipping into Silent mode for my prints that need to be extremely detailed and accurate.
End Results with Tuned Bambu Lab X1 Carbon PETG Settings
After making the suggest changes, your Bambu Lab X1 Carbon PETG settings should be finely tuned and capable of producing amazing prints. I am including two prints I have done in PETG with the tuned X1C PETG settings so you can see the final result.
Tuned Bambu Lab X1C PETG Settings Sample Print #1
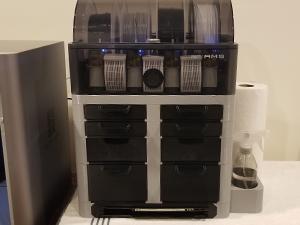
The first sample print I wanted to showcase with my tuned Bambu Lab X1 Carbon PETG settings is this beautiful behemoth my AMS is sitting on top of. What you’re looking at here is a Bambu Lab inspired organizational system.
It is designed to store all of your spare parts and 3D printing tools & accessories. After nearly 6 days straight of printing and 4+ spools of PETG later, the project was completed.
And best of all, not a single printing issue was encountered! The individual pieces came out super clean and everything snapped together, no problem. If you’re at all curious about this project, check out my Bambu Lab Organization System page. There, I’ve documented this amazing storage box solution and highlighted all the different printed parts I used for my build.
Tuned Bambu Lab X1 Carbon PETG Settings Sample Print #2
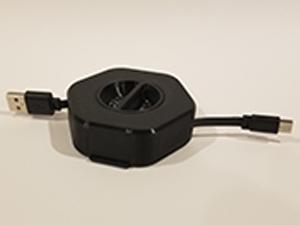
The next sample print I wanted to highlight was this Cable Winder by user squinn. This is a print in place piece that has a fully functioning hinge and a clasp to keep it shut once closed. This is a semi-tricky print if you don’t have you printer and filament tuned correctly.
As you can see, this turned out great using the recommending Bambu X1 Carbon PETG settings mentioned above. The winder’s color and texture is perfect on all sides and the actual winding mechanism works perfectly.
Tuned Bambu X1 Carbon PETG Settings Sample Print #3
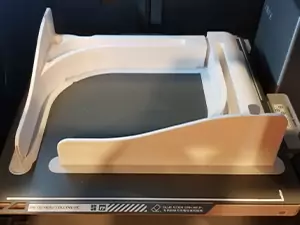
The last sample print I wanted to show is a much larger one than the previously mentioned Cable Winder. These are the feet for an Expandable Photo Studio by user 3db.creation. This was one of my first ever successful PETG prints on my Bambu Lab X1 Carbon.
This is a pretty tough print because their are small openings where a piece of paper is meant to slid into (bottom left corner of the photo), along with some threads for printed screws to be screwed into. You need your printer working right to be able to pull this off.
Bambu X1C PETG Settings for eSun Filament
I just wanted to briefly talk about eSun PETG filament. I love this stuff and everywhere I see Bambu Lab 3D printers discussed, eSun filament is always highly recommended. There is even some discussion/theory that eSun is what Bambu Lab use as their own branded filament. The reason I bring this up is because eSun has an entire collection of profiles you can download that are specific to their filaments for use on the Bambu Lab X1C (or P1P/P1S too).
Their ‘HS Parameters for Bambu Lab & Creality’ (HS = high speed) download contains the profiles you can load directly into Bambu Studio. The PETG profile is excellent and produces high quality prints, provided the filament is dried out.
eSun PETG filaments are regarded as some of the best in the industry and are very inexpensive, especially compared to Bambu Lab filament. Plus, they are often on sale, which is always appreciated. If you are using eSun PETG, give their profiles a try as they are designed specifically for eSun’s own filaments.
Final Thoughts
I hope this has helped with your PETG woes on the Bambu X1C. By just tweaking a few of the Bambu Lab X1 Carbon PETG settings, you will start getting perfect quality prints every single time. No more having to deal with stringing, poor bed adhesion, layer line gaps or random blobs on the surfaces!
Really, it all boils down to just slowing things down a bit, and making sure your temperatures are high enough, without being too hot. The Bambu X1C is fast, and in this case, the default settings are just a tad too fast for PETG! Thanks for reading and happy printing!
You May Also Enjoy


