
Discover 5 of the best Acererak the Archlich combo plays in MTG! Acererak has a unique ability that will return it to your hand after casting it, which makes this card a combo magician. By utilizing other combo pieces, you can create a really awesome Acererak combo by continuously casting it and racking up massive value!
Hands down, the best Acererak the Archlich combo is the Acererak the Archlich + Rooftop Storm combo! On top of that combo, I have outlined 4 other crazy good Acererak combos that will win you the game if executed. Follow along as we keep casting Acererak as many times as we please, all while venturing into the dungeon and draining our opponents to death.
Table of Contents
This post contains affiliate links, which means I may receive a small commission, at zero cost to you, if you make a purchase through a link.
How an Acererak the Archlich Combo Works
The way an Acererak the Archlich combo works is by making sure you have not completed, or even started the Tomb of Annihilation dungeon at all in your game. If you are trying to pull off an Acererak the Archlich combo, consider the Tomb of Annihilation combo off limits to you. If for some reason you have already started the Tomb of Annihilation dungeon, the combo will only work up until that dungeon has been completed and not infinitely. Once that dungeon has been completed, the combos will no longer work since Acererak will remain on the battlefield instead of returning to your hand.
Assuming you have not completed the Tomb of Annihilation dungeon, Acererak the Archlich has an ability that reads: ‘When Acererak the Archlich enters the battlefield, if you haven’t completed Tomb of Annihilation, return Acererak the Archlich to its owner’s hand and venture into the dungeon.’ Essentially, every time you cast Acererak, you will be returning it back to your hand and then venturing into a dungeon! By utilizing certain cards, detailed below, you will be able to continually keep casting Acererak and continually keep venturing into the dungeon for as long as you’d like.
Venturing into a Dungeon
The payoff for any Acererak the Archlich combo is the continuous venturing into a dungeon you will be doing. As mentioned above, the Tomb of Annihilation is off limits and while technically you could venture into the Dungeon of the Mad Mage, it is not recommended since you will deck yourself faster and won’t be able to drain your opponents.
This only leaves us with the Lost Mine of Phandelver dungeon, and luckily, it has all the abilities we need built into it. The most relevant of those abilities is Dark Pool the room with the ability that says ‘Each opponent loses 1 life and you gain 1 life.’ By continuously venturing into the Lost Mine of Phandelver, we will be draining each opponent for 1 life! This will hopefully allow us to finish off all of our opponents before we deck ourselves from the ability of the Temple of Dumathoin room which states ‘Draw a card.’
All of the Acererak the Archlich Combo Payoffs
All of the Acererak the Archlich combo plays will have the same payoff. When you successfully pull off one of the Acererak the Archlich combos, it will result in as many ‘Venture into the Dungeon’ triggers as you want. As mentioned above, by utilizing the Lost Mine of Phandelver, you will receive nearly infinite of the following, depending on which rooms you choose while venturing into this dungeon:
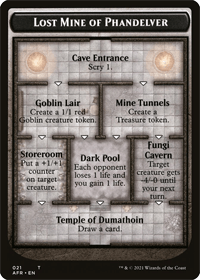
- Cave Entrance: Scry 1
- Goblin Lair: Create a 1/1 red Goblin creature token
- Mine Tunnels: Create a Treasure token
- Storeroom: Put a +1/+1 counter on target creature
- Dark Pool: Each opponent loses 1 life and you gain 1 life
- Fungi Cavern: Target creature gets -4/-0 until your next turn
- Temple of Dumathoin: Draw a card
The important ability here is the Dark Pool room’s ‘Each opponent loses 1 life and you gain 1 life’ ability. This is the win condition for all of the Acererak the Archlich combos and luckily, you can take go into the left or right rooms at level 2 of the dungeon and still be able to get into the Dark Pool room!
In addition to the above triggers from the Lost Mine of Phandelver, with Acererak leaving and entering the battlefield each time, you will also receive nearly infinite ‘Enters the Battlefield’ and ‘Leaves the Battlefield’ triggers. Also, if you’re playing a storm deck, your storm count will continually grow!
Combo Warnings
While executing any of the Acererak the Archlich combos, you will still need to pay attention to a few things to make sure you don’t accidentally kill yourself or make a misplay.
- If you have already started the Tomb of Annihilation dungeon, you can only execute this combo how ever many times until that dungeon is complete
- Once completed, Acererak will remain on the battlefield and will not be returned to your hand
- That is why it is preferable to have not even started the Tomb of Annihilation dungeon at all in the game
- In order to kill your opponents, you MUST have enough cards in your library since the last ability of the Lost Mine of Phandelver dungeon will make you draw a card
- If you don’t have enough cards in your library to pull off the win, you will need to stop casting Acererak the Archlich, otherwise you will deck yourself and lose
5 of the Coolest Acererak the Archlich Combo Plays
Now that you know how an Acererak the Archlich combo works, here are the top 5 Acererak combos. Each Acererak the Archlich combo below has a detailed breakdown showing you exactly how it works and how to play it efficiently and optimally.
#1 Acererak the Archlich + Rooftop Storm Combo
Total Mana Investment: 6 mana (1 blue, 5 generic)
Total Cards Needed: 2
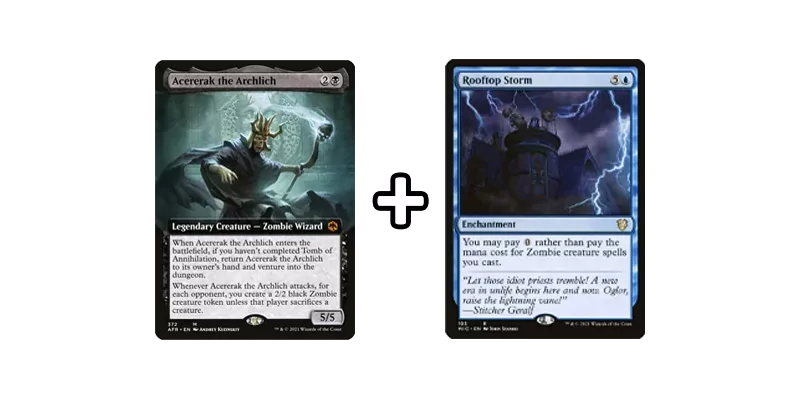
The Acererak the Archlich + Rooftop Storm combo is probably the easiest combo to pull off seeing as how it is only a two card combo. The idea is to continually keep casting Acererak the Archlich for 0 mana utilizing Rooftop Storm‘s ability. Acererak will be returned to your hand, and you will be venturing into the dungeon each time Acererak is cast.
The Setup
You must NOT have completed, and preferably not even started, the Tomb of Annihilation dungeon. Aside from that, the setup for this Acererak the Archlich combo is pretty straightforward. You will need to have Acererak the Archlich in your hand and Rooftop Storm already on the battlefield.
Executing the Combo
With Rooftop Storm already on the battlefield and Acererak the Archlich in your hand, simply pay 0 and cast Acererak. Since you have not completed the Tomb of Annihilation dungeon, Acererak will be returned to your hand, allow you to venture into a dungeon. If you are already in a dungeon, continue along with it until complete. Once you are complete, if you are not currently venturing a dungeon, begin the Lost Mine of Phandelver dungeon. With Acererak the Archlich returned to your hand, continue casting it for 0 using Rooftop Storm‘s ability and then rinse and repeat until you have drained your opponents to death!
#2 Acererak the Archlich + Aluren Combo
Total Mana Investment: 4 mana (2 green, 2 generic)
Total Cards Needed: 2
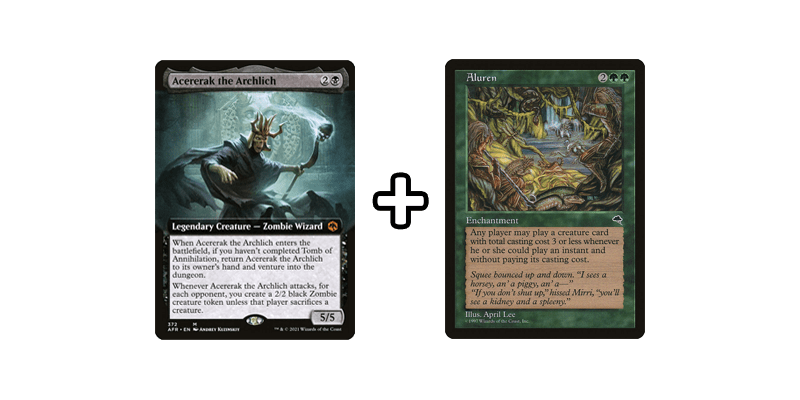
The second Acererak the Archlich combo on our list is very similar to the first. It is a two card combo except instead of being in Dimir colors, this combo is in Golgari colors. It is the Acererak the Archlich + Aluren Combo. The premise behind this combo is to use Aluren‘s ability to continuously keep casting Acererak the Archlich without paying its mana cost and rack up the venturing abilities. The only downside to this combo is that Aluren is pretty expensive, and on top of that, is also a part of the Reserved List.
The Setup
As mentioned above, you must NOT have completed, and preferably not even started, the Tomb of Annihilation dungeon. Like the Rooftop Storm combo, this combo’s setup is very simple. You will need to have Acererak the Archlich in your hand, and Aluren already on the battlefield. It might make sense to have 4 total mana available so you can play Aluren the turn you want to execute the combo, since you opponents can also play free creature spells with Aluren‘s ability.
Executing the Combo
The first step is to get Aluren on the battlefield with 4 total mana, if it is already not on the battlefield. Once Aluren is on the battlefield, simply cast Acererak the Archlich from your hand for free (and at flash speed if you’d like) with Aluren‘s ability. Since you have not started or completed Tomb of Annihilation, Acererak will go back to your hand and trigger the venture into a dungeon ability. Finish your current dungeon if you are already in one and then proceed to the Lost Mine of Phandelver dungeon and go off! Continue casting/returning Acererak to your hand and the combo is off to the races.
#3 Acererak the Archlich + Heartless Summoning + Relic of Legends Combo
Total Mana Investment: 6 mana (2 black, 4 generic)
Total Cards Needed: 3
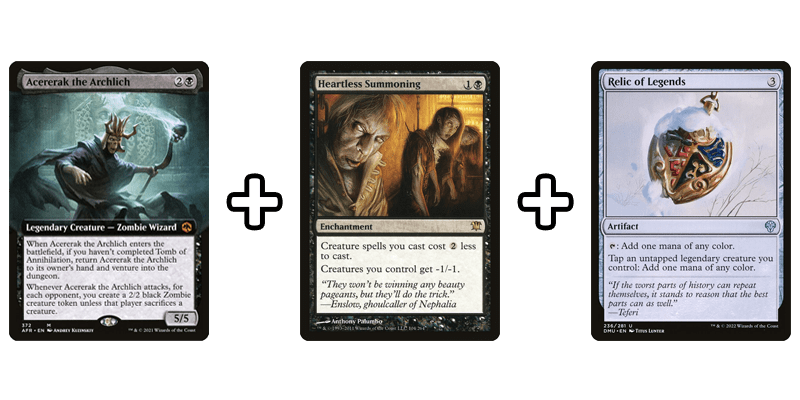
Now we move on to the three card Acererak the Archlich Combos. These are a bit more difficult to pull off due to needing one more card, but they are just as powerful and still relatively easy to execute. The first of the three-card-combos is the Acererak the Archlich combo using Heartless Summoning and Relic of Legends. The way this specific combos works is by utilizing Heartless Summoning‘s discount to cast creature spells for 2 generic less and using Relic of Legends to tap Acererak to produce 1 black mana. Then, same as the other combos, continually case Acererak and accumulate a ton of venture into the dungeon triggers.
The Setup
Like always, you must NOT have completed the Tomb of Annihilation dungeon in your game. Then, you will need to have Acererak the Archlich in your hand, and have Heartless Summoning & Relic of Legends already on the battlefield.
Executing the Combo
Once Heartless Summoning and Relic of Legends are on the battlefield, you will need to have access to 1 black mana to initially cast Acererak the Archlich. Once you have cast Acererak and it is on the battlefield, hold priority and use Relic of Legends ability to tap an untapped Legendary Creature you control (Acererak) to produce 1 black mana.
Then let Acererak‘s ability resolve, returning it to your hand and venturing into a dungeon. Like always, our goal is to venture into the Lost Mine of Phandelver dungeon. Then, recast Acererak with the 1 black mana you created by tapping it with Relic of Legends ability. Remember, all your creature spells will cost 2 generic mana less to cast with Heartless Summoning on the battlefield. Continue with the loop and over and over again.
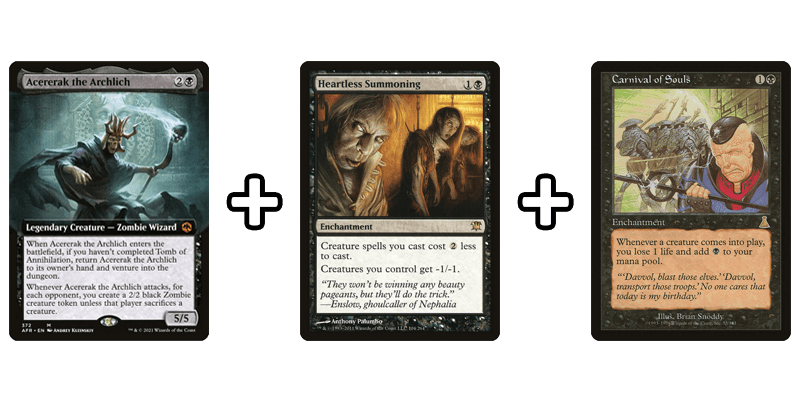
#4 Acererak the Archlich + Heartless Summoning + Carnival of Souls Combo
Total Mana Investment: 5 mana (3 black, 2 generic)
Total Cards Needed: 3
This next three-card Acererak the Archlich Combo is nearly identical to the previous one, with a slight downside. The idea is the same, have 1 black mana available to cast Acererak, since it is discounted by Heartless Summoning‘s ability. Then, using the ability from Carnival of Souls, use the 1 black mana it generates by Acererak entering the battlefield to recast Acererak once it has been returned to your hand. The downside to this version of the combo is that you will lose life from Carnival of Souls. Additionally, Carnival of Souls is semi-expensive and is on the Reserved List.
The Setup
As per usual, you must NOT have completed the Tomb of Annihilation dungeon. Along the same lines as all of the combos, you will need to Acererak the Archlich in your hand, and have Heartless Summoning & Carnival of Souls on the battlefield.
Executing the Combo
Just like the previous combo, once Heartless Summoning and Carnival of Souls are on the battlefield, you will need to have access to 1 black mana to initially cast Acererak the Archlich. Then when you cast Acererak and it is on the battlefield, you will get 1 black mana from Carnival of Souls (and also lose a life). Save this 1 black mana to recast Acererak once its venturing into the dungeon trigger has resolved and it is back in your hand to recast Acererak. As a reminder, all of your creature spells will cost 2 generic mana less to cast with Heartless Summoning on the battlefield so recasting Acererak will only cost 1 black mana. Repeat *
* For every 4 times you go through this loop, you will lose 3 life (since you gain a life in the Dark Pool room of the he Lost Mine of Phandelver dungeon). So make sure you have enough life to take out your opponents, or stop recasting Acererak when your life gets too low.
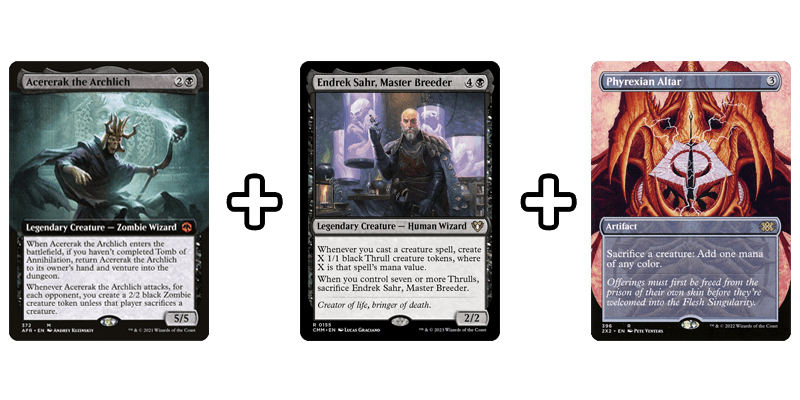
#5 Acererak the Archlich + Endrek Sahr, Master Breeder + Phyrexian Altar Combo
Total Mana Investment: 11 mana (2 black, 9 generic)
Total Cards Needed: 3
Out of the 5 Acererak the Archlich combos being discussed, this is probably the hardest one to cast because not only does it require three cards to pull of the combo, it also has the highest total mana investment needed. Once you start the combo, you will be using Endrek Sahr, Master Breeder‘s ability of creating 1/1 Thrull creature tokens to sacrifice to Phyrexian Altar to create the mana needed to continuously cast Acererak the Archlich over and over.
The Setup
You know the deal by now, you must NOT have completed the Tomb of Annihilation dungeon. Then, as per usual, you’ll need to have Endrek Sahr, Master Breeder & Phyrexian Altar already on the battlefield with Acererak the Archlich in your hand.
Executing the Combo
Unlike the other combos mentioned, this Acererak the Archlich combo requires you to have the full 3 mana to cast Acererak initially. But, once you have initially cast Acererak, you will not be needing any additional mana, since we will be generating it from the Phyrexian Altar. After casting Acererak the first time, Endrek Sahr, Master Breeder‘s ability triggers (on cast) and will create 3x 1/1 Thrull creature tokens. Once Acererak enters the battlefield, hold priority and use Phyrexian Altar‘s ability to sacrifice those 3x Thrulls to generate 3 black mana.
This mana will be used to recast Acererak. Then let Acererak‘s ability resolve, returning it to your hand and venturing into a dungeon. Same as before, we want to start going through the Lost Mine of Phandelver dungeon. Then, just recast Acererak with the 3 black mana you created with the Altar by sacrificing those tokens. Repeat this exact process until you’ve killed your opponents from the Dark Pool room or are about to deck yourself due to the Temple of Dumathoin room.
Final Thoughts
Acererak the Archlich is one of my favorite cards of all time. I had so much fun writing out and explaining these Acererak the Archlich combos you can (somewhat) easily pull out in games. I hope you enjoyed all of these Acererak the Archlich combo plays. On top of these, there are tons of other really cool Acererak the Archlich combo plays you can pull off. The 5 outlined here are the ones that are the easiest to execute on a somewhat reliable basis. In fact, you can easily add to these combos as well.
This is especially true in regards to the Acererak the Archlich Combo: Heartless Summoning & Carnival of Souls. For example, by having a Soul Warden on the battlefield, you will completely negate the life lost due to Carnival of Souls ability since Acererak will be entering the battlefield for each loop of the combo! With that being said, is there an even more efficient Acererak the Archlich combo I am missing? If so, let me know in the comments. Thanks for reading, and enjoy combo’ing off!
The Acererak the Archlich artwork was done by Andrey Kuzinskiy from Adventures in the Forgotten Realms.
You May Also Enjoy







Leave a Reply