Creating yourself a Batocera Le Potato retro gaming console is both fun and easy to do. Batocera is a great piece of software that runs on my single-board computers, like the Le Potato, that makes retro gaming a breeze. With just a few project parts, you can be enjoying some awesome retro gaming in no time!
By following this simple guide, you can get a working Batocera download and have your own Batocera Le Potato console running with very little effort. This guide will give you full step-by-step instructions, including a complete parts list and download list! Let’s take the power of the Le Potato with the amazing functionality of Batocera.linux and create the ultimate budget retro gaming console.
Table of Contents
This post contains affiliate links, which means I may receive a small commission, at zero cost to you, if you make a purchase through a link.
Piracy & Batocera.linux
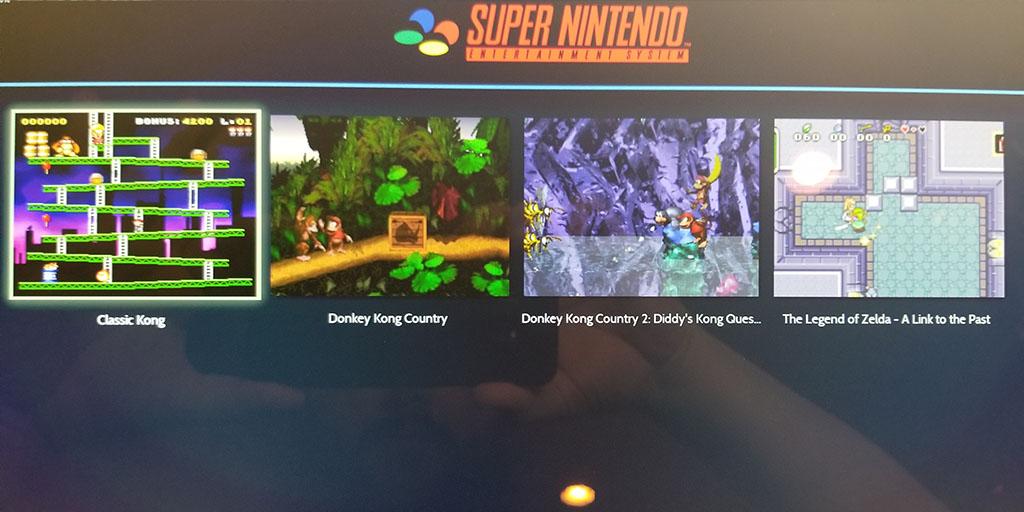
Before we begin with this Batocera Le Potato project, I need to state that I do not endorse piracy. I will not be linking to or providing access to any pirated materials, including the actual game files themselves, and additionally includes music files, images, source code, etc.. For more information on creating your own roms from your own games, take a look at this guide here. For this write up, I have taken my actual copies of Donkey Kong Country 1 & 2 along with The Legend of Zelda – A List to the Past and created my own roms to use.
Batocera Le Potato Project
This Batocera Le Potato project is a pretty simple one. Follow along with this project guide and you will be retro gaming in no time. The project consists of the following steps:
- Batocera Le Potato Project Parts
- Batocera Download Link & Other Software Downloads
- Setting up the Batocera SD Card
- Setting up a controller for Batocera.linux
- Enabling and using WiFi in Batocera.linux
- Transferring Games to your Batocera Le Potato board
Batocera Le Potato Project Parts
- Required Parts:
- Le Potato board – you’ll want to get the 2GB memory model
- Le Potato Power Supply
- Micro SD Card – 256GB (you can get a smaller/larger micro SD card, just make sure it is A2 rated)
- Optional Parts:
- Le Potato Heatsink (optional but highly recommended)
- Linux-based USB WiFi Dongle (optional but required if you want to use WiFi)
- Standalone Le Potato Case (optional but highly recommended since it has a built in exhaust fan)
- Game Controller:
- I find an Xbox Series X Controller with a USB cable to be most useful
- Alternatively, you could also use the 8BitDo Sn30 Pro Controller for a more retro-feeling controller
Batocera Download + Other Software Downloads
- Batocera Download: Batocera Le Potato Image
- At the top of the page, under the Files section you will find the latest Batocera Le Potato image download link
- The Batocera download should be named similarly to batocera-s905-lepotato-36-20230304.img.gz, with the ending numbers possibly being different depending on the version of the Batocera Le Potato image
- A program to extract the image from the Batocera download – I find 7-Zip to be extremely useful for this
- An image writing program – I am on Windows and I use Win32 Disk Imager
- An FTP client to send your files to your Le Potato – I use WinSCP since I am a Windows user
Step 1: Prepare the Batocera SD Card
Once you have all of the project parts, gotten the Batocera download secured and have inserted your SD card in to your computer, you can begin flashing the Batocera SD card for use with the Le Potato board. First, extract the .gz file to obtain the actual Batocera image file (.img). Use 7-Zip to extract the image from the compression file.
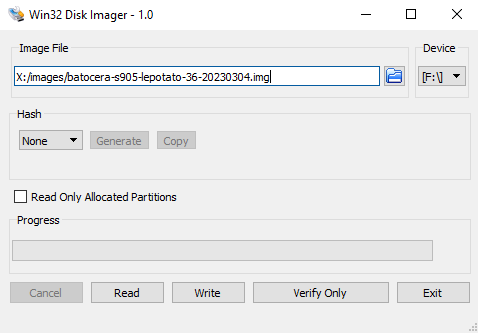
Now that we have the .img file, we will flash that to the SD card. For Windows users, Win32 Disk Imager is lightweight and just simply works. Open Win32 Disk Imager (or whatever flashing software you are using) and make sure the correct drive letter is selected. Point the image file to your Batocera image. For Win32 Disk Imager, it is as simple as clicking Write and waiting a few minutes. Once it is complete, your Batocera SD card is ready to be inserted into your Le Potato board!
Step 2: Launch Batocera and Configure a Controller
Now that you have the Batocera SD card flashed and ready to go, insert it into your Le Potato board if you have not done so already. Using an HDMI cable, connect your Le Potato to a monitor or TV and power up the Le Potato. You will be greeted with the Batocera startup screen, assuming the flash was successful! The device will begin to do its first boot up initialization and then you will see the main menu screen.
Go ahead and plug in your controller. You should hopefully see a notification popup letting you know your controller is detected. I use an Xbox Series X controller and it was detected right away.
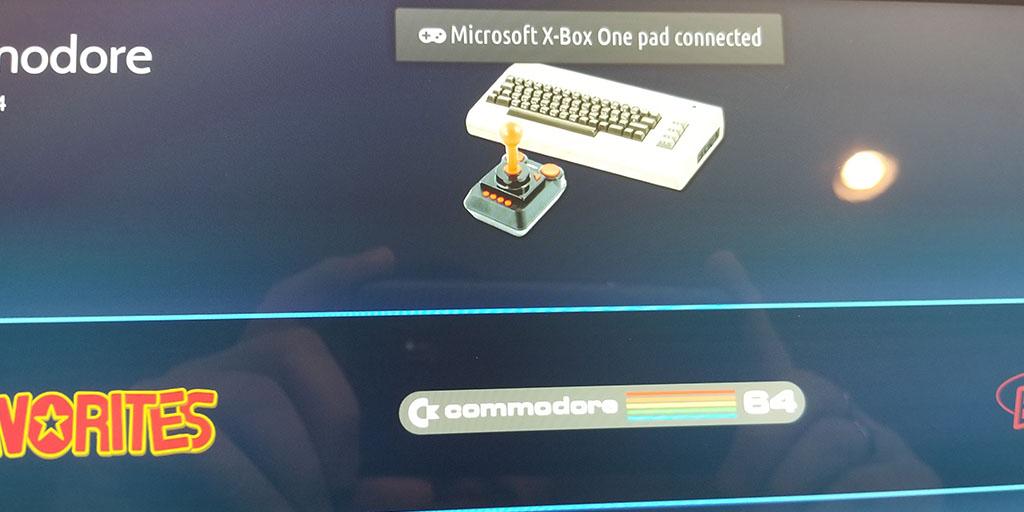
By default, my Xbox controller’s button mappings were all wonky and not correct at all. It took a bit of figuring out, but my ‘start’ button was actually mapped to my controller’s back/select button. Even stranger, the ‘A’ button (south button) was mapped to my Series X’s screenshot button… don’t ask me why, I have no clue lol. Figure out your controller’s ‘start’ button and ‘A’ button. Once you have those figured out, we will immediately fix any messed up button mappings.
Open up the Main Menu by pressing the ‘start’ button. Again, for me on my Xbox controller, that was initially the back/select button. Navigate to Controller & Bluetooth Settings options. Press the ‘A’ button to go into that section. That was the screenshot button on my Xbox controller. Then the first option will allow you to remap your controller. Follow the directions on screen by holding any button for about 3 seconds and then the mapping screen will present itself. Just press the button on your controller for each option and you should be good to go.
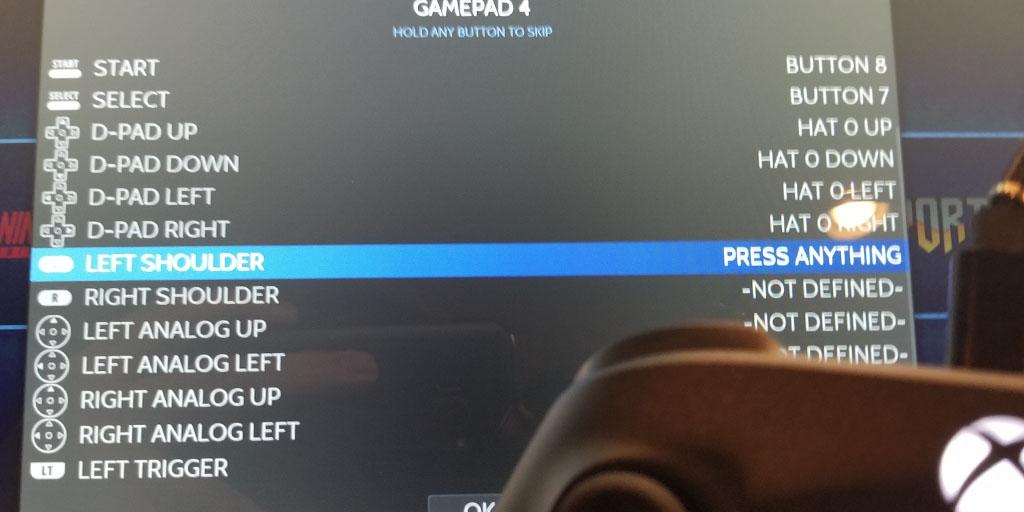
Just a quick tip, whatever you configured as your hotkey button is what you will use, while in game, to go back to the Batocera interface. The way this button works is: hold the hotkey and then press your configured ‘A‘ button together. This will bring up a menu system and allow you to use save states, configure game options, and go back to the Batocera main interface, among tons of other options!
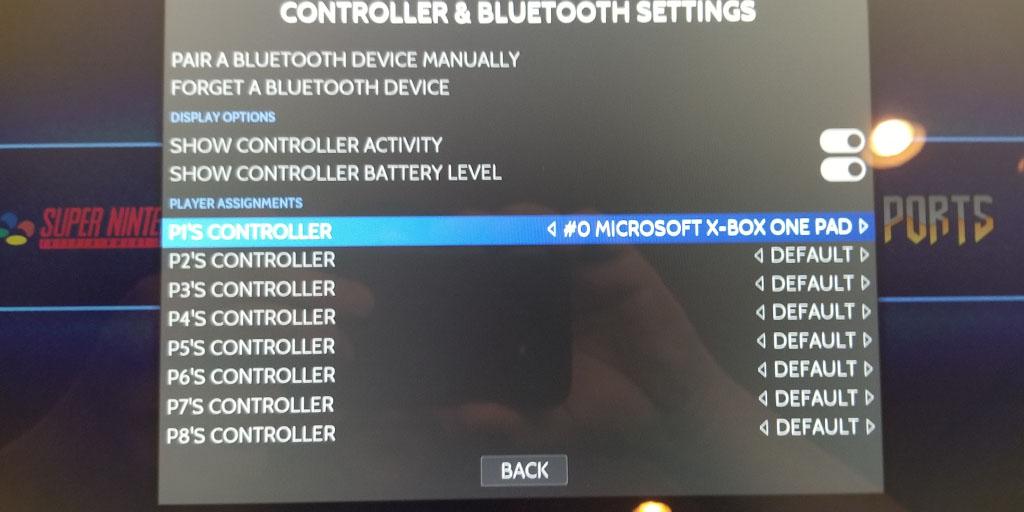
Now that you have your controller mappings all sorted out, the last step with the controller is to set it as your default controller for Player 1. Go back into the Navigate to Controller & Bluetooth Settings menu and then navigate down to P1’s Controller. By using the Left and Right d-pad, you can then select your controller and back out to the Main Menu.
Step 3: Setting Up WiFi on your Batocera Le Potato
If you are planning to use an Ethernet connection on your Batocera Le Potato, go ahead and plug it in now. Make note of your Batocera Le Potato’s IP address and go ahead and skip down to step 4.
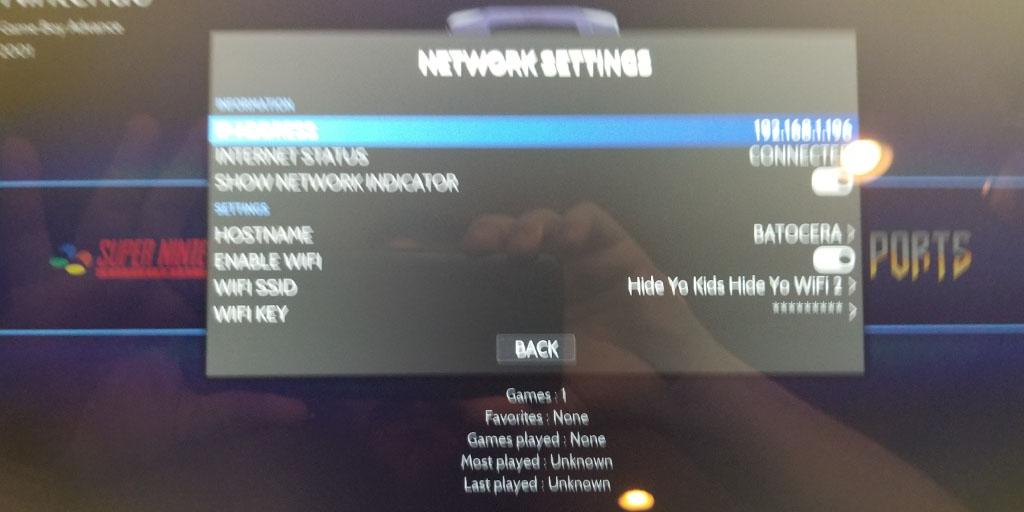
If you are wanting to use WiFi on your Batocera Le Potato, plug in the WiFi adapter into your Le Potato now, if you have not done so already. Next, press start on your controller to bring up the main menu. Navigate down to the Network Settings. From there, you want to make sure Enable WiFi is toggled on. Then you can go ahead and enter your network’s name and password in the WiFi SSID and WiFi Key fields, respectively.
Back out of the Network Settings and wait 10 or 15 seconds and then go back in. You should now be connected to your WiFi network and see an IP address. Make note of this Batocera Le Potato’s IP address as we will be using it in the next section: Using FTP to add our games!
Step 4: Transfer Games to your Batocera Le Potato Via FTP
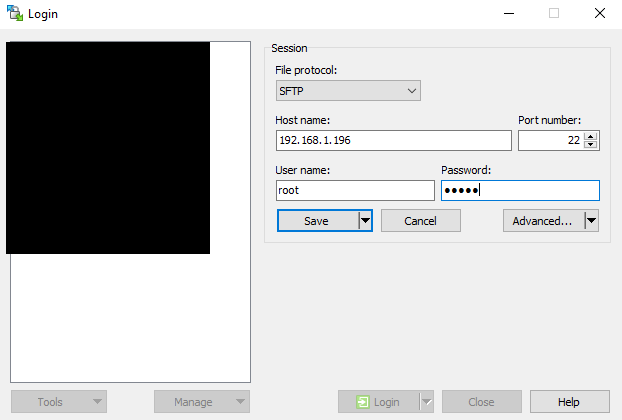
Now that your Batocera Le Potato board all set up with a functioning controller, the next logical step would be to add games. The quickest and easiest way is to do this is with FTP. Using WinSCP from the Batocera Download & Other Downloads section, launch it and begin to configure your connection. This is where the Batocera Le Potato’s IP address will be needed. Go ahead and enter that into the Host Name field. For the username, enter root and for the password, enter linux. You want to make sure all other configurations are the same as mine below. Once you have this information entered in, go ahead and click Login.
Upon logging in, you will see the file structure for the Batocera La Potato. You will need to go to the root directory and navigate to the userdata directory. That is where all of your game files, game saves, images, custom configurations, etc. will reside.
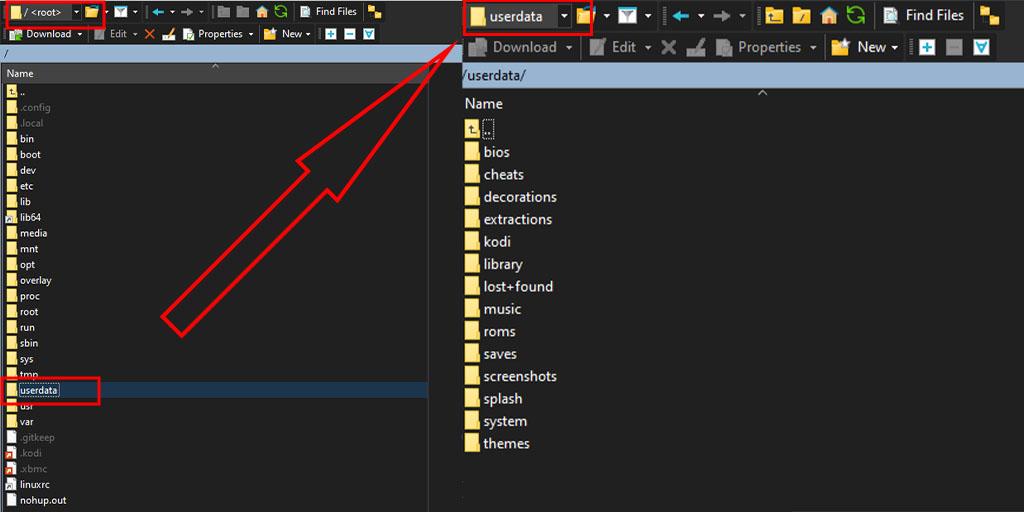
Each console you want to add games to will have a dedicated folder. These dedicated folders are located at /userdata/roms/<console_folder>. For my purposes, I am adding three SNES tiles, so I will need to navigate to /userdata/roms/snes. You will simply drag and drop the files to their proper folders and this will upload them on to your Batocera Le Potato! The time it takes will vary depending on each file’s size and the total number of files you are uploading at a time. For my three SNES games, it took about 5 seconds to complete.

For most older games, you can either have the rom file itself, or zip the rom file, which ever you prefer. I like to save as much space as possible, for any older games from SNES and older, I tend to zip each file up. For naming, the stand format is as follows, FULL-GAME-TITLE (COUNTRY-OF-ORIGIN).FILE-EXTENSION. For example, DKC2 would be named: Donkey Kong Country 2 – Diddy’s Kong Quest (USA).zip, since my copy is from the US. Once you are finished uploading files to your Batocera Le Potato, go ahead and close out of WinSCP and go to your Le Potato. We have one last step to get the games to show up and also have pretty boxart/images!
Final Step: Scanning & Scraping Your Games
The last step to complete our Batocera Le Potato project is to scan our library and scrape the metadata. Open up the Main Menu and navigate to Game Settings and then select Update Gamelists. Doing this will scan all of your rom folders for any new files and add them to Batocera so you can actually play your games.
When the scan has completed and your verify that your games are showing up under their appropriate system, open the Main Menu again. This time, head to Scraper. Go down to the Scrape From and cycle through the options until you find TheGamesDB. Go down and hit the Scrape Now button.
Finally, repeat the process to update the gamelists again. By doing this, the game boxart/images will be applied your games. Congrats, you are now all finished and ready to sit back and play some retro games on your brand new Batocera Le Potato console!
Wrapping Up the Batocera Le Potato Project
Thanks for following along on this Batocera Le Potato retro gaming console DIY project! All things considered, this project was pretty simple and was ready for some awesome retro gaming in a very short amount of time. If you run into any trouble, or have any questions, don’t hesitate to leave a comment. I will do my best to try and help out. And with that, I hope you enjoyed and happy retro gaming!
You May Also Enjoy



Leave a Reply