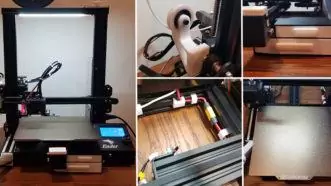
Many people are interested in having OctoPrint setup on Ender 3 printers or other models while using a Raspberry Pi alternative. The Raspberry Pi has been extremely hard to get, especially at retail price so that is where the Le Potato comes in. Having a Le Potato OctoPrint setup is just as easy as having a Raspberry Pi OctoPrint setup.
Libre Computer’s Le Potato is an excellent Raspberry Pi alternative. A Le Potato OctoPrint system is easy to setup and just works, simple as that. All you need to do is install Ubuntu on an SD card and then install and run OctoPrint on Ubuntu. This is a complete step-by-step guide to complete a Le Potato OctoPrint setup on your 3D printer. From hardware, to software, to everything in between.
Table of Contents
This post contains affiliate links, which means I may receive a small commission, at zero cost to you, if you make a purchase through a link.
What is OctoPrint?
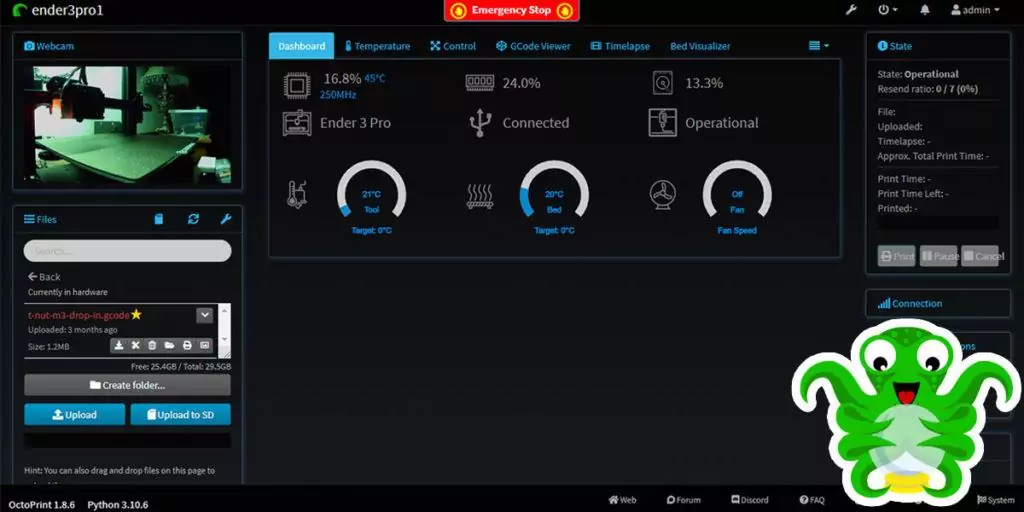
OctoPrint is a piece of software that is designed to interface with your 3D printer. You install OctoPrint on separate device, such as a Le Potato or a Raspberry Pi, and attach that device to your 3D printer. In my case, I attached my Le Potato OctoPrint server to my Creality Ender 3 Pro with a micro USB cable.
This allows the OctoPrint server the ability to communicate with the 3D printer by sending commands back and forth. In layman’s terms, doing this will allow you to remotely control your printer without having to use the built in touchscreen/click wheel.
Plus, it opens up the world to new features and functionality such setting up a webcam to view your prints, capturing time lapse videos, seeing your print progress layer by layer, getting accurate print time estimates, and so much more.
With OctoPrint setup, you are able to download and install 3rd party plugins which really enhance your 3D printing experience. In fact, I have a great article about the best OctoPrint plugins to install that will get you on the track to 3D printing greatness, after you have fully set up OctoPrint.
Why Use a Le Potato OctoPrint Setup?
The Le Potato is a wonderful little piece of hardware. It was designed to be a drop in replacement for Raspberry Pi 3 Model B boards, with a better processor and GPU than the previously mentioned Pi model. Unlike Raspberry Pi boards, the Le Potato board is readily available and affordable. For running OctoPrint, the Le Potato has all the necessary hardware requirements needed, and then some.
At the end of the day, all you really need is a computer running Linux with decent hardware specs to run and setup OctoPrint. For a little context, I have been running my Le Potato OctoPrint setup for months now and have not had any issues and couldn’t be happier. If you’re ready, let’s get down to brass tacks and start our Le Potato OctoPrint setup journey!
Step-by-Step Le Potato OctoPrint Setup
Let’s begin our Le Potato OctoPrint setup. In this guide, I will be using my Ender 3 Pro, but the process is nearly identical for any other printer, aside from the Le Potato’s 3D printed case that was specifically made for the Ender 3 and the Ender 3 Pro.
This guide will take you through the entire process from selecting and obtaining the required parts, installing Ubuntu, getting OctoPrint setup and finally configuring your OctoPrint setup.
Project Parts
- Le Potato board – make sure to get the 2GB memory model
- Le Potato Power Supply
- Le Potato Heatsink (optional)
- Linux-based USB WiFi Dongle (optional)
- Standalone Le Potato Case (optional)
- 3D printed Le Potato Case – Ender 3 LCD enclosure (this Le Potato case only works for an Ender 3)
- Use the standalone case
- Micro SD Card
- A USB Webcam (optional)
- 3D printed Camera Mount (optional – this camera mount only works for an Ender 3)
- 90 Degree USB Micro cable (optional)
- Power Blocking USB Dongle (optional)
Downloads
- Visit the Ubuntu Distro Page from Libre Computer and download the Ubuntu 22.04 .img.xz file for the server edition of the aml-s905x-cc
- The actual version number may be different, but here is what the Ubuntu version 22.04.3 file’s name looks like:
- ubuntu-22.04.3-preinstalled-server-arm64+aml-s905x-cc.img.xz
- An SSH client – Putty is what I use
- An image writing program – I am on Windows and I use Win32 Disk Imager
- A program to extract the Ubuntu image – I use 7-Zip
OctoPrint Setup Step1: Prepare
Writing Ubuntu to an SD Card
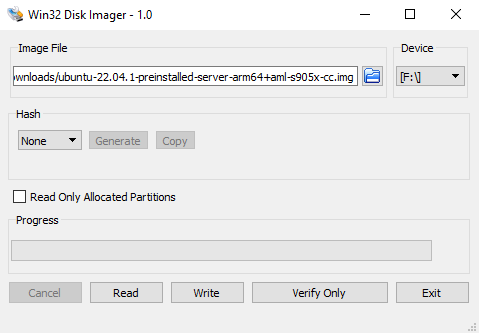
Once you have all of your physical parts and the software and OS downloaded, we will start by writing the Ubuntu image to your SD card. Extract the image from the Ubuntu 22.04 file you downloaded. It will have a .xz extension. We want the .img file within it.
Use 7-Zip, or whatever other program you prefer to extract. Next, open up Win32 Disk Imager. Select the newly extracted Ubuntu .img file and the SD card from the ‘Device’ dropdown. Click on Write and once the image has finished writing to the SD card, we can put it into the Le Potato.
Network Settings – Obtaining the IP Address
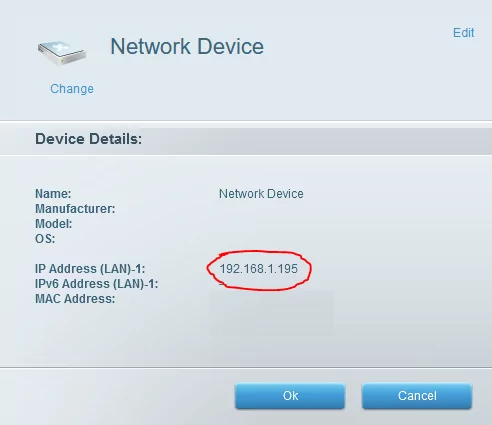
With the SD card loaded in the Le Potato, take an ethernet cable and plug the unit directly into your router. Leave the USB WiFi Dongle unplugged for now. If you ended up getting a heatsink for your Le Potato, go ahead and install it now. Plug in the power supply. Once the Le Potato has booted up, you will need to grab its IP address.
To get the IP address, we can either plug a monitor into the Le Potato’s HDMI port and read it off of the display, or we can check our router’s setup/maintenance webpage to find the device’s IP address. Personally, I just grabbed the IP address from my router’s setup webpage as seen below.
SSH into the Le Potato
With the IP address obtained, we can now SSH into the Le Potato. On a computer on the same network as the Le Potato, initiate an SSH session with the IP address. With Putty, set Connection Type to SSH, use the IP address we just obtained and then use port 22. Click Open and your SSH session should begin.
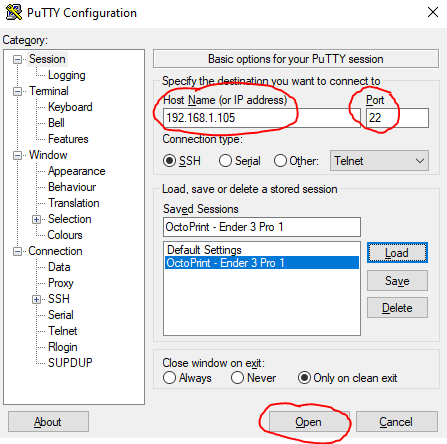
The first thing that happens after initiating the SSH session is a prompt to login. The default username and password for Ubuntu is ubuntu/ubuntu. On the first login, you will probably be required to change the password. Make sure you remember this username and password for the future. First things first, if you want to use WiFi, now is the time to plug in the USB WiFi Dongle.
You will need to set up your WiFi network on the Le Potato. Follow this Set Up WiFi on Ubuntu guide for a step-by-step walkthrough. If you are planning to use a hardwired connection to your router, you can skip to the OctoPrint Setup Phase.
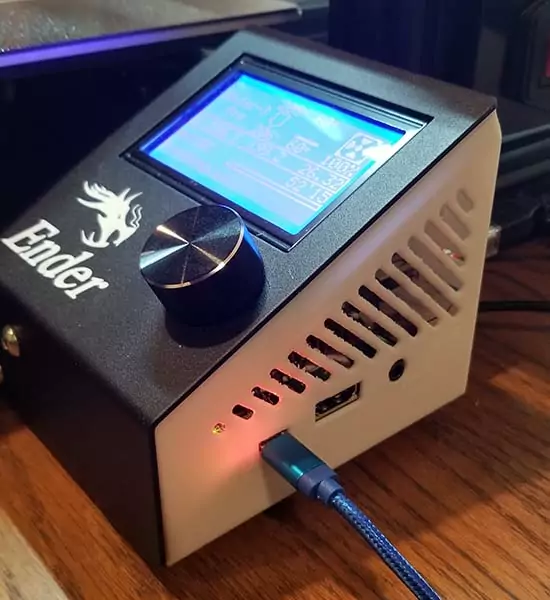
If you are now using WiFi and need to relocate the device, do so now. Go ahead and put your Le Potato in its home. If you are using the Ender 3 LCD Enclosure, go ahead and attach that to your printer with the Le Potato inside. The only thing that should be plugged into the Le Potato at the moment is the power cord and the SD card.
OctoPrint Setup Step 2: Install OctoPrint
Download Dependencies
Finally, start a new SSH session with your new IP address obtained in the Set Up WiFi on Ubuntu guide or continue using the IP address you had before if you are using an ethernet cable. While connected via SSH, on the terminal, install git:
sudo apt install gitNow, we will want to clone the brains of this whole operation. This is a script called octoprint_deploy by Paul Paukstelis that will guide us through the entire OctoPrint setup. Once you are finished with this guide, if everything was successful and if you are able to, please visit his GitHub repo and consider using his Buy Me a Coffee link to support/donate to him. A lot of work went into his script and he has really helped out the community by providing it to us.
With all of that being said, go ahead and run this command after installing git:
git clone https://github.com/paukstelis/octoprint_deploy.gitThe beauty of this script is that you have the ability to run multiple instances of OctoPrint for multiple 3D printers. While I currently only have the one 3D printer, this script gives us a bit of futureproofing. Follow these instructions closely.
Essentially, we will be creating a base OctoPrint instance that will act as a template. After creating the base, we will create the ‘real’ OctoPrint instance for our printer. During the creation of the ‘real’ OctoPrint instance, we will configure the camera and set up any other printer-specific configurations.
Install OctoPrint Base Instance
Begin by running:
sudo octoprint_deploy/octoprint_deploy.shYou should be prompted with a ‘menu’. Now, select Prepare system by entering ‘1‘ on the Select operation: line and press enter on your keyboard.
Selection operation: 1Next, select Ubuntu 20+, Mint, Debian, Raspberry Pi OS by entering ‘2‘ on the Installation type: line and press enter.
Installation type: 2After that, you will be prompted if you are ready to begin. Enter ‘y‘ on the command line. After pressing ‘y’ on your keyboard, OctoPrint will begin to install along with all of its dependencies. This can take a while, so don’t worry if it does.
Ready to begin? [y/n]: yOnce everything has finished installing, you will be prompted about using haproxy. Again, enter ‘y‘,
Use haproxy? [y/n]: yThe next option will ask you which video streamer you would like to use. If you are not using a camera, select none. For everyone using a camera, select the ustreamer option by entering ‘2‘.
Which video streamer you would like to install?: 2You will then be asked to create the admin user. You can choose whatever username and password you want, but I chose to use admin/admin so it is easy to remember. After that, enter ‘n‘ for anymore remaining prompts until you are prompted with: Connect to your template instance and setup the admin user if you have not done so already.
Starting template service on port 5000
Connect to your template instance and setup the admin user if you have not done so already.
Next, open a browser and navigate to http://aml-s905x-cc/. If that does not work, you can try either http://[LE_POTATO_IP_ADDRESS]:5000 or http://aml-s905x-cc:5000. You will be prompted to log in. Use the admin account you just configured through the command line (admin/admin for me) and follow the setup wizard options.
Since this is just a base instance and not the real one, do not attempt to add any cameras yet. And just to make sure, the printer should not be connected to the Le Potato still. We will add cameras and connect the printer shortly. After finishing the setup wizard on the browser, go back to the command line. If you don’t see the octoprint_deploy main menu, keep entering ‘n‘ until you do:
*************************
octoprint_deploy 0.2.3
*************************

1) New instance     3) Add Camera       5) Utilities        7) Update
2) Delete instance  4) Delete Camera    6) Backup Menu      8) Quit
Install OctoPrint Real Instance
On the main menu, select New instance by entering in ‘1‘ and pushing enter. You will be prompted for an instance name. Enter in whatever name you’d like. For a little bit of context, this script allows you to use one device (the Le Potato) to run multiple instance of OctoPrint for multiple 3D printers.
I only have a single printer, but I have the flexibility to create a new OctoPrint instance for a new printer, if I get another in the future. With that being said, I named my instance ‘ender3pro1’, that way if I end up getting more Ender 3 Pro models in the future, I can create new instances called ‘ender3pro2’, ‘ender3pro3’, ‘ender3pro4’, etc.
You will then be asked if you want to use all default values. Go ahead and enter ‘y‘ to continue on. We are almost ready to plug the printer into the Le Potato.
Use all default values? [y/n]: yThis section is where the Power Blocking USB Dongle mentioned in the Project Parts List comes in. If you have an Ender 3 (and all Ender printers???) you will need this gadget. Some other printers may have this issue as well, but there is an issue where the Ender 3 will pull power from the Le Potato which is not good.
This gadget stops power from transmitting through the USB cable and makes it data only. Basically, plug this dongle into the back of your Le Potato and then plug the USB cable from the printer into this (after the next step).
Now you will be asked if you would like to auto-detect your printer. Go ahead and enter ‘y‘ and then plug a USB cable into your printer and into the back of the Le Potato. You need to do this somewhat quickly as there is a 60 second timeout.
Begin auto-detect printer serial number for udev entry? [y/n]: yAfter plugging in your printer to the Le Potato, the auto-detect may or may not work. For my Ender 3 Pro (and all Ender printers???) it will not work. That is not a huge issue. All that means is that you MUST use the same USB port on the Le Potato all the time for the printer’s USB cable. If you printer was detected, you output will be different than what is shown. If your printer is undetected, go ahead and enter ‘y‘.
Printer Serial Number not detected
Do you want to use the physical USB port to assign the udev entry? If you use this any USB hubs and printers detected this way must stay plugged into the same USB positions on your machine as they are right now [y/n]: y
Next, you will be asked if you would like to connect a camera. If you aren’t using a camera, skip ahead. Go ahead and enter ‘y’ and just like the printer, connect the camera to Le Potato within 60 seconds.
Would you like to auto detect an associated USB camera (experimental)? [y/n]: ySame thing as with the printer, my camera failed to auto-detect. Just always use the same USB port for the camera as well if yours fails to detect. When prompted about the Camera Port, press enter. Make note of the port number.
Camera Serial Number not detected
Camera will be setup with physical USB address of 1-1.3:1.0.
The camera will have to stay plugged into this location.
Camera Port (ENTER will increment last value in /etc/camera_ports):
You will then be asked to configure you camera by setting the resolution and the frames per second. I chose 1920×1080 for the resolution and 15 for the frames per second. Lastly, you will be asked if you’re ready to write all changes. Go ahead and enter ‘y‘.
Camera Resolution [default: 640x480]: 1920x1080
Camera Framerate (use 0 for ustreamer hardware) [default: 5]: 15
Ready to write all changes. Do you want to proceed? [y/n]: y
OctoPrint Setup Final Step: Configure
All done with the command line work. If you’ve made it this far, congratulations! Just a few finishing touches and you’ll be good to go. Go back to your browser and navigate to http://aml-s905x-cc/[INSTANCE_NAME]/ (for me that is http://aml-s905x-cc/ender3pro1/). Just a head’s up, the tailing ‘/’ on the address is needed. If that does not work try http://[LE_POTATO_IP_ADDRESS]:5001.
Login with your admin account we created earlier in the Base Instance Setup (for me it is admin/admin). After logging in, on the OctoPrint UI, find the wrench icon (top right) and click it. Navigate to Webcam & Timelapse.
For the Stream URL, enter http://aml-s905x-cc/cam_[INSTANCE_NAME]/?action=stream.
For me, that is http://aml-s905x-cc/cam_ender3pro1/?action=stream.
If that does not work, try http://[LE_POTATO_IP_ADDRESS]:5001/cam_[INSTANCE_NAME]/?action=stream
For Snapshot URL, enter http://aml-s905x-cc/cam_[INSTANCE_NAME]/?action=snapshot.
For me, that is http://aml-s905x-cc/cam_ender3pro1/?action=snapshot.
If that does not work, try http://[LE_POTATO_IP_ADDRESS]:5001/cam_[INSTANCE_NAME]/?action=snapshot
Last step is to set the Path to FFMPEG to /usr/bin/ffmpeg. Phew, finally done. Hopefully this has helped you with your OctoPrint setup. Enjoy it, OctoPrint is super cool and extremely useful.
Le Potato OctoPrint Setup Wrap Up
Now that you have successfully completed your Le Potato OctoPrint setup on your Ender 3 printer, or any other printer, your journey begins. OctoPrint gives you so much flexibility and capability. After getting used to it, start looking at installing some plugins. This is where OctoPrint really shines. If you’re looking for a starting point, checkout my Best OctoPrint Plugins to Install guide. Happy printing!
You May Also Enjoy

