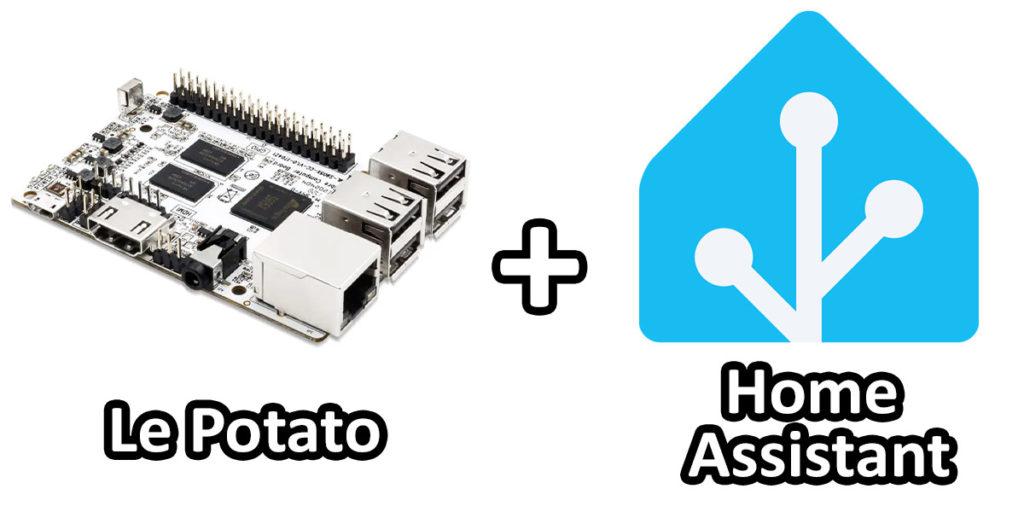
If you are looking for an affordable solution to home automation, a Le Potato Home Assistant setup may be exactly what you need. The Le Potato is a single-board computer similar to the Raspberry Pi that can run Linux and nearly anything a Raspberry Pi can. A Le Potato board makes for an excellent Home Assistant device. But how do you install Home Assistant on a Le Potato?
The following is a full guide for setting up a Home Assistant Le Potato installation. This Le Potato Home Assistant setup will walk you through the entire process starting with setting up an SD card and ending with you logging into Home Assistant running on your Le Potato. In less than an hour’s time, you will have you very own Home Assistant device all set and ready to start adding your smart devices to it. Let’s jump in!
Table of Contents
This post contains affiliate links, which means I may receive a small commission, at zero cost to you, if you make a purchase through a link.
What is Home Assistant?
A quick and dirty explanation of Home Assistant is that it is an open source home automation platform intended to give you full control over all of your smart devices with an emphasis on privacy. The device with Home Assistant running on it acts as the hub to integrate all of your home’s devices and services. This allows you the ability to create events and automated processes that work with all of your devices and services.
A simple example of this would be to create a ‘Bed Time’ automated process. When activated, the process would turn off all the lights in your bedroom and set a wake up alarm. Another example would be to create a ‘Wake Up’ automated process. This would turn on your lights, turn on the TV, and start the coffee maker.
Why the Le Potato Home Assistant Supervised Version?
So why do we want to install the Le Potato Home Assistant Supervised version? Well, the biggest reason to use the Le Potato Home Assistant Supervised version is so that you can access the add-ons with Home Assistant. The add-ons are where a lot of the really cool functionality resides which really bring everything to life and make configurations a whole lot easier. The Home Assistant Core/Container versions do not allow access to the add-ons, thus we are opting to go with the Supervised version.
Le Potato Home Assistant Setup
Before we begin, all credit for this guide goes to Libre Computer with their How to Install Home Assistant Supervised knowledge base article. I was able to follow it and get Home Assistant up and running. If you are tech-savvy and are familiar with Linux, and more specifically, Debian, that guide is a breeze.
But I made this guide for those who are not quite as familiar or comfortable with such things. This installation guide will be a complete step-by-step process, from start to finish. With that being said, please be sure to read it thoroughly and you will have your very own Le Potato Home Assistant setup in no time!
One final note before we begin, this guide assumes you will be using Ethernet for your Le Potato. For most uses and users, there shouldn’t be a reason you would need WiFi. You can just leave your Le Potato plugged into your router since this will be a network device, not a device you will need to directly interact with. All Home Assistant configurations, setup, and functionality will be done through a browser/app on a separate computer/device. If for whatever reason you do need WiFi, you will need to get a Linux-compatible WiFi dongle for your Le Potato and configure Debian to use WiFi.
Home Assistant Le Potato Setup Components
- Le Potato board – make sure to get the 2GB memory model
- Le Potato Power Supply
- Le Potato Heatsink (optional)
- Le Potato Case with an included fan (optional)
- A good Micro SD Card that is rated A2 and C10
For the initial steps, you will also need a keyboard (USB) and monitor (with an HDMI port) to hook up to the Le Potato. For situations like this, I really like using a USB mouse/keyboard combo unit. It is small and can be used with almost anything. I also use a neat portable monitor that tucks away in a drawer when not in use (I have a review of this specific ForHelp Portable Monitor if you’re interested). These components are completely optional and overkill, but I find uses for them all the time and wanted to share. You can just use a regular USB keyboard and any ole monitor with an HDMI port.
Le Potato Home Assistant Setup Downloads
- Debian 12 for Le Potato
- An SSH client – is use Putty
- A bit-accurate image writing program (NOT Balena Etcher) – I use Win32 Disk Imager
- A program to extract the Debian image – I use 7-Zip
Home Assistant Le Potato Setup Step 1: Debian SD Card
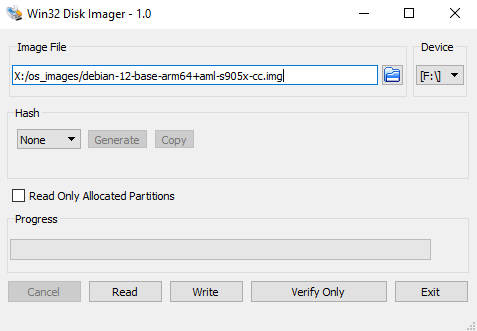
To begin, you will need to set up Debian on your SD card. Extract the Debian 12 .xz file with 7-Zip so you are left with a Debian 12 .img file. From there, insert your SD card into your computer and write that image to the SD card. Since I am on a Windows machine, I use Win32 Disk Imager. If you are using that program, just select the correct drive letter under the Device dropdown, point the Image File to your .img file, and click the Write button. After about 3 minutes, your SD card will be good to go.
Le Potato Home Assistant Installation Step 2: User Setup
Now that you have the SD card setup with Debian, go ahead and insert it into your Le Potato. Next, connect a USB keyboard to the Le Potato, along with a monitor and an Ethernet cable from your router. Go ahead and power up the Le Potato and after a minute or two, you will be prompted to login. The default username and password is root/root.
Once you have logged in with those default credentials, you will be tasked with changing the root user’s password. Make this whatever you’d like, but be sure to remember it! The first step after changing the root user’s password is to create a ‘real’ user. I chose the username admin. Be sure to remember this username/password as well!
sudo adduser <YOUR_USER>

For example: sudo adduser admin
When creating your new user, you will be asked to enter basic information about that user. Feel free to leave the name, room number, phone number, etc. blank (I did) by just pressing enter for each entry. After the user has been created, we want this user to be able to use sudo. Enter the following command:
sudo adduser <YOUR_USER> sudo

For example: sudo adduser admin sudo
Next up is to run the apt-get update command. Just a small word of caution, this will take a bit to complete:
sudo apt-get updateNow that we have the root user’s password changed and created our own new user, the next step is to setup SSH.
Le Potato Home Assistant Installation Step 3: SSH
The Debian Le Potato image does not have SSH enabled by default. I highly recommend doing the rest of the setup via SSH, but if you’d rather not, skip down to Step 5. The reason I recommend continuing via SSH is that once we are finished with the Le Potato Home Assistant installation, you won’t need a monitor or a keyboard hooked up to the Le Potato anymore. It will run as a headless device (meaning no peripherals connected to it).
Should you need to do any command line tasks on the Le Potato in the future, it will be much easier to SSH into the device, rather than connect a monitor and keyboard up to it again. Once more, this is completely up to you. If you plan to go the SSH route, run this command to install the SSH server:
sudo apt install openssh-serverAfter a pretty large output of text, your command line will prompt you whether to continue on or not. Go ahead and type Y and then hit enter.
Do you want to continue? [Y/n]After a little while, the SSH server will be installed. Once it is finished, you will see an output similar to this, below. The important things to look for are that the service is enabled, the preset is enabled and the status is active (running).
● ssh.service - OpenBSD Secure Shell server
     Loaded: loaded (/lib/systemd/system/ssh.service; enabled; preset: enabled)
     Active: active (running) since Tue 2023-10-17 02:44:05 UTC; 6min ago
       Docs: man:sshd(8)
             man:sshd_config(5)
   Main PID: 1639 (sshd)
      Tasks: 1 (limit: 1987)
     Memory: 3.3M
        CPU: 1.112s
     CGroup: /system.slice/ssh.service
             └─1639 "sshd: /usr/sbin/sshd -D [listener] 0 of 10-100 startups"
Now that the SSH server is up and running, we can remove the keyboard and monitor from the Le Potato and move to a desktop/laptop to finish everything else up. This should be a lot easier since you can now copy/paste the commands, instead of manually typing them on the Le Potato directly! But before that, we will want to grab the Le Potato’s IP address and make note of it. Run this command and jot down the IP address:
hostname -IThe output from this command should be your device’s IP address. Here was my output, for example:
192.168.1.197Home Assistant Le Potato Installation Step 4: Setting up the SSH Client
Now that the SSH server has been installed on the Home Assistant Le Potato, you will want to open your SSH client of choice on your desktop/laptop. Be sure to leave the Le Potato plugged in to your router and powered on. Again, me being on a Windows machine, the SSH client I use is Putty.
For the Host Name (or IP address) field in Putty, you will ideally want to use your Le Potato’s hostname: debian-12-aml-s905x-cc*. For the Port, set that to 22. Click the Open button and a terminal window will popup.
There are a few advantages to using the Le Potato’s hostname, rather than the IP address. For instance, if your Le Potato needs to reboot or a power outage happens, the IP address may change on you when it powers back up. By using the hostname, you wont need to worry about whether the IP address has changed.
* If the hostname (debian-12-aml-s905x-cc) does not work, you will need to use the IP address you made note of in the prior step for the Host Name (or IP address) field.
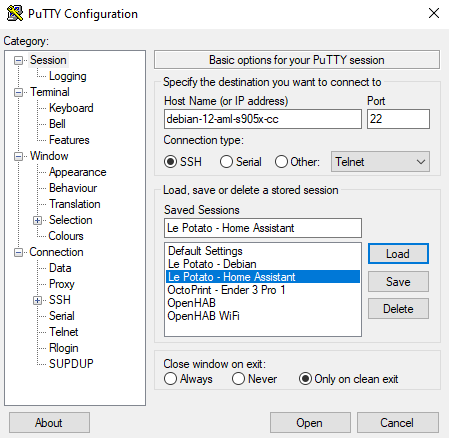
If a popup message is displayed, accept it and you will then be prompted to login to your Le Potato on the terminal. Use the username/password for the user we created in the beginning (NOT the root user). For me, that was the admin user. After you have logged in, all prep work is complete and you should be remotely connected to your Le Potato via SSH!
Home Assistant Le Potato Installation Step 5: System Commands
If you are remotely connected to your Le Potato, any time you run commands with sudo in them, you may be prompted to enter the password for your created user. If you are, just enter the password and the command will execute like normal.
Now we need to run a few system commands. Begin by running the following set of commands, one after another:
sudo eatmydata apt -y install apparmor jq wget curl udisks2 libglib2.0-bin network-manager dbus lsb-release systemd-journal-remote systemd-resolvedecho 'GRUB_CMDLINE_LINUX_DEFAULT="$GRUB_CMDLINE_LINUX_DEFAULT apparmor=1 security=apparmor"' | sudo tee /etc/default/grub.d/apparmor.cfgecho 'GRUB_CMDLINE_LINUX_DEFAULT="$GRUB_CMDLINE_LINUX_DEFAULT systemd.unified_cgroup_hierarchy=0"' | sudo tee /etc/default/grub.d/cgroupsv1.cfgsudo update-grubFinally, you will need to reboot the Le Potato before moving on to the actual Home Assistant installation. It may take a few minutes for the Le Potato to finish rebooting.
sudo rebootAfter a minute or two, you will need to reconnect to the Le Potato via SSH. If you’ve set up your SSH client (Putty for me) to use the Le Potato’s hostname* (debian-12-aml-s905x-cc), it should connect without any issues after rebooting. Once you have connected to your Le Potato via SSH, or if you’re not using SSH and the device has finished rebooting, log back in with your the user account we created and proceed to step 6. Remember, for me that was the admin user.
* If the IP address has changed and the hostname (debian-12-aml-s905x-cc) does not work, you will need to connect the Le Potato back up to the monitor and the USB keyboard and rerun the hostname -I command again to grab the new IP address. Use that IP address instead of debian-12-aml-s905x-cc in your SSH client.
Home Assistant Le Potato Installation Step 6: Install Docker & Home Assistant
The next step for the Home Assistant Le Potato installation is to set up Docker. Go ahead and run the following command:
curl -fsSL get.docker.com | sudo shNow that Docker has been installed, we will be installing the supervised version of Home Assistant. The first thing you will need to do is go to the Home Assistant GitHub and grab the URL for the .deb file. Scroll to the bottom of the page to see the list of assets and then make note of the URL for the asset that ends with _aarch64.deb. Now that you have that URL go ahead and run the following command:
wget <URL_YOU_JUST_MADE_NOTE_OF>

For example: wget https://github.com/home-assistant/os-agent/releases/download/1.6.0/os-agent_1.6.0_linux_aarch64.deb
This will download that .deb file onto your Le Potato so you can run it. You will need to grab the file’s name. Run the ls command and the output should give you your Home Assistant .deb file’s name. For example: os-agent_1.6.0_linux_aarch64.deb is the file the wget command above downloaded onto my Le Potato.
lsos-agent_1.6.0_linux_aarch64.debNow that you have the .deb file’s name, we will want to install it. Run this command so the installation process can begin:
sudo dpkg -i <YOUR_FILE_NAME>

For example: sudo dpkg -i os-agent_1.6.0_linux_aarch64.deb
Next, run this command:
wget -O homeassistant-supervised.deb https://github.com/home-assistant/supervised-installer/releases/latest/download/homeassistant-supervised.debSimilar to above, that command will download the homeassistant-supervised.deb file on to your Le Potato. After it has finished, install that .deb file by running:
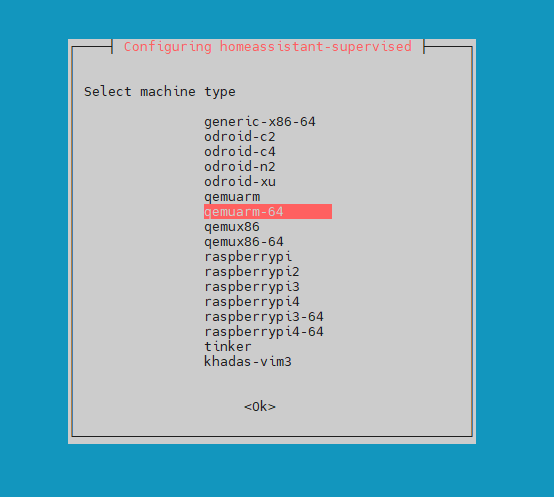
sudo apt install ./homeassistant-supervised.debAfter a bit of time, you will be greeted with a screen that should look similar to this, below. Using the up/down arrow keys on your keyboard, highlight the qemuarm-64 option and then hit enter to select it. The process will take a little bit of time to finish up, but once it does, we will finally be able to access Home Assistant!
The last thing we want to do, before actually accessing our installed Home Assistant, is grab the IP address again. Run the same hostname command as before and make note of your IP address. It may be the same, or it might have changed. For example, mine was the same 192.168.1.197 as before, but yours may be different.
hostname -IHome Assistant Le Potato Setup Step 7: Initial Setup/Configurations
Now open a browser window and go to http://debian-12-aml-s905x-cc:8123/*. Bookmark this page because this is the link you will use from now on to access any and all Home Assistant functionality!
* Again, if for some reason the hostname does not work, you will need to manually use the Le Potato’s IP address we just retrieved and instead go to http://<YOUR_IP_ADDRESS_YOU_MADE_NOTE_OF>:8123/. For example, for my Home Assistant Le Potato setup, the URL would be http://192.168.1.197:8123/.
The Home Assistant Le Potato installation is complete, but now Home Assistant will be finishing up the setup and configurations. This will take a few minutes. One it is complete, your browser window should look similar to mine, below. Go ahead and click on the blue Create my smart home button and follow the on screen directions to finish the initial setup configurations.

Final Thoughts on the Le Potato Home Assistant Setup
You should now have your Home Assistant Le Potato instance up and running. This completes the Le Potato Home Assistant installation process. You are now free to start building out your home automation using the Home Assistant webapp! If you run into any problems, feel free to let me know in the comments. I will do my best to try and help you out.
What are your plans for Home Assistant? I am always curious to hear what other folks are planning to do with their setups and would love to hear from you. Let me know in the comments! Also, feel free to share some of your most unique smart devices and your plans for them. I hope this Le Potato Home Assistant setup guide has been helpful. Thanks for reading, and happy tinkering.







Leave a Reply